Configuring Azure Blob as Syteca Binary Data Storage by Using the NFS Protocol
This guide assumes that Syteca is already deployed on Azure. If not, it can be deployed by way of Azure Marketplace: https://azuremarketplace.microsoft.com/en-us/marketplace/apps/ekran-system-inc.ekransystem?tab=Overview
The configuration described in the steps below creates an Azure Blob storage container with anonymous access from a selected virtual network only. For this reason, it is important to use the virtual network that Syteca was deployed on.
To configure Azure Blob as Syteca binary data storage by using the NFS protocol, follow the steps below (in sequence).
Table of Contents
1. Creating an Azure Storage Account by Using the NFS 3.0 Protocol and Hierarchical Namespace Support
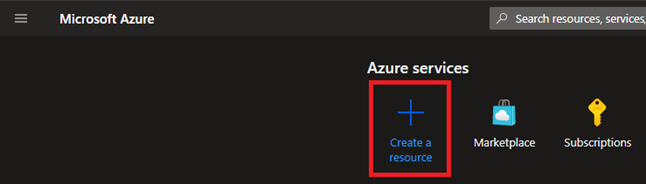
1. Log in to the Azure Portal: https://portal.azure.com
2. On the Home page, click Create a resource.
3. In the search field, enter “storage”, and then press Enter.
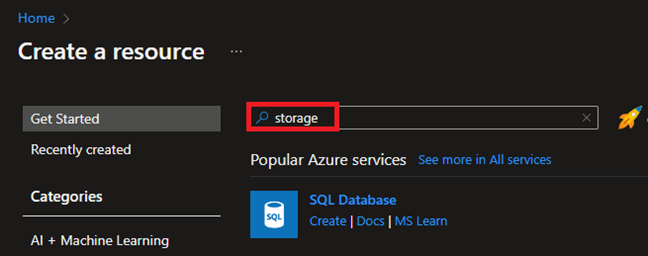
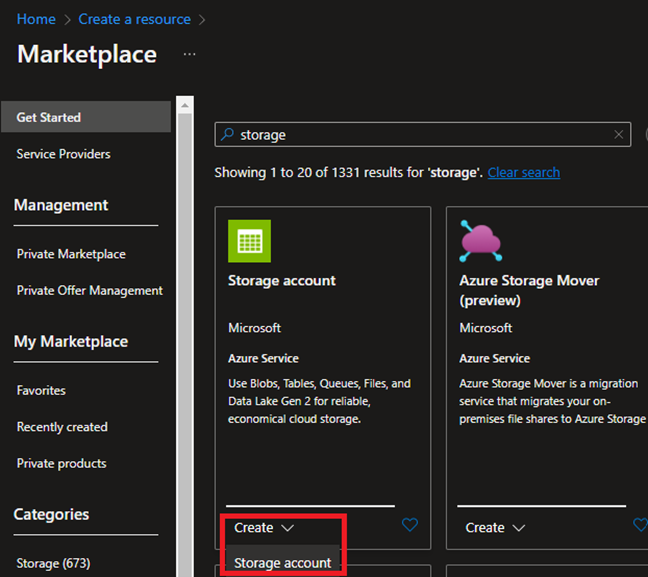
4. Find the Storage account service, and then click Create, and select Storage account.
5. On the Basics page, specify the following values in the corresponding fields:
• Resource group: Select the resource group where the account will be stored, or create a new one.
• Storage account name: Enter a name for the new account.
• Region: Select the same Azure region that Syteca was deployed on.
• Performance: Select the Premium performance type.
• Premium account type: Select the Block blobs option.
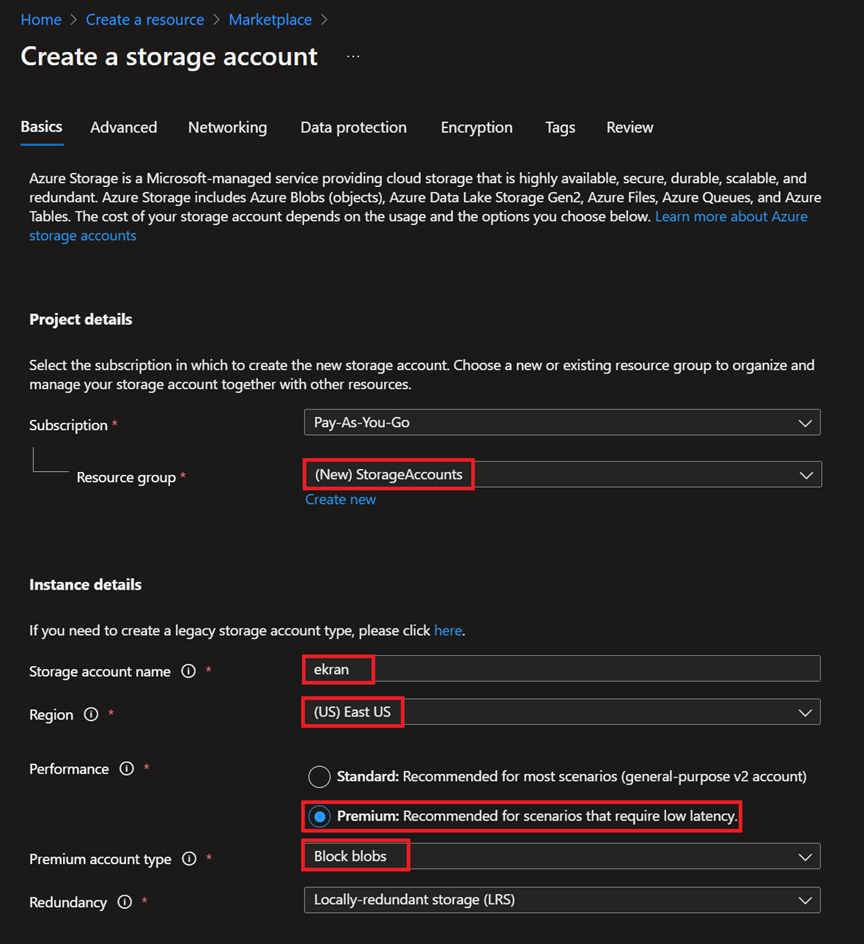
NOTE: Optionally, a Redundancy option can also be selected.
6. Click the Next: Advanced button.
7. On the Advanced page, select the following 2 checkboxes:
• Enable hierarchical namespace
• Enable network file system v3
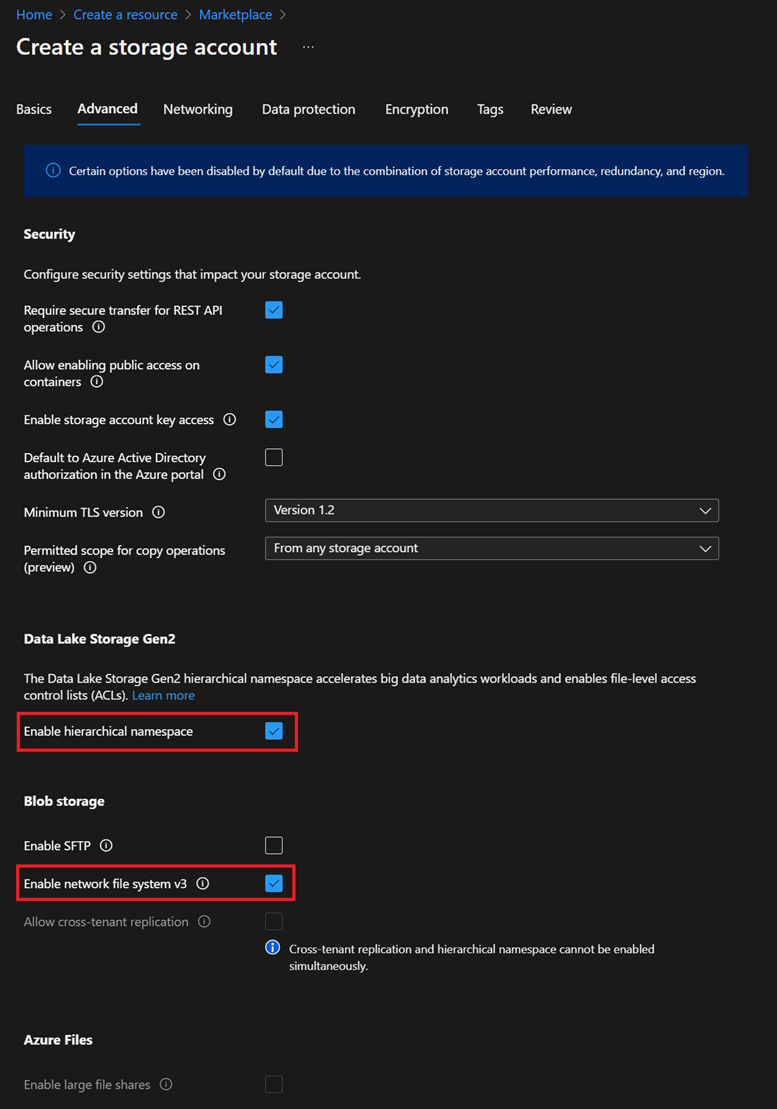
NOTE: The other settings are optional.
8. Click the Next: Networking button.
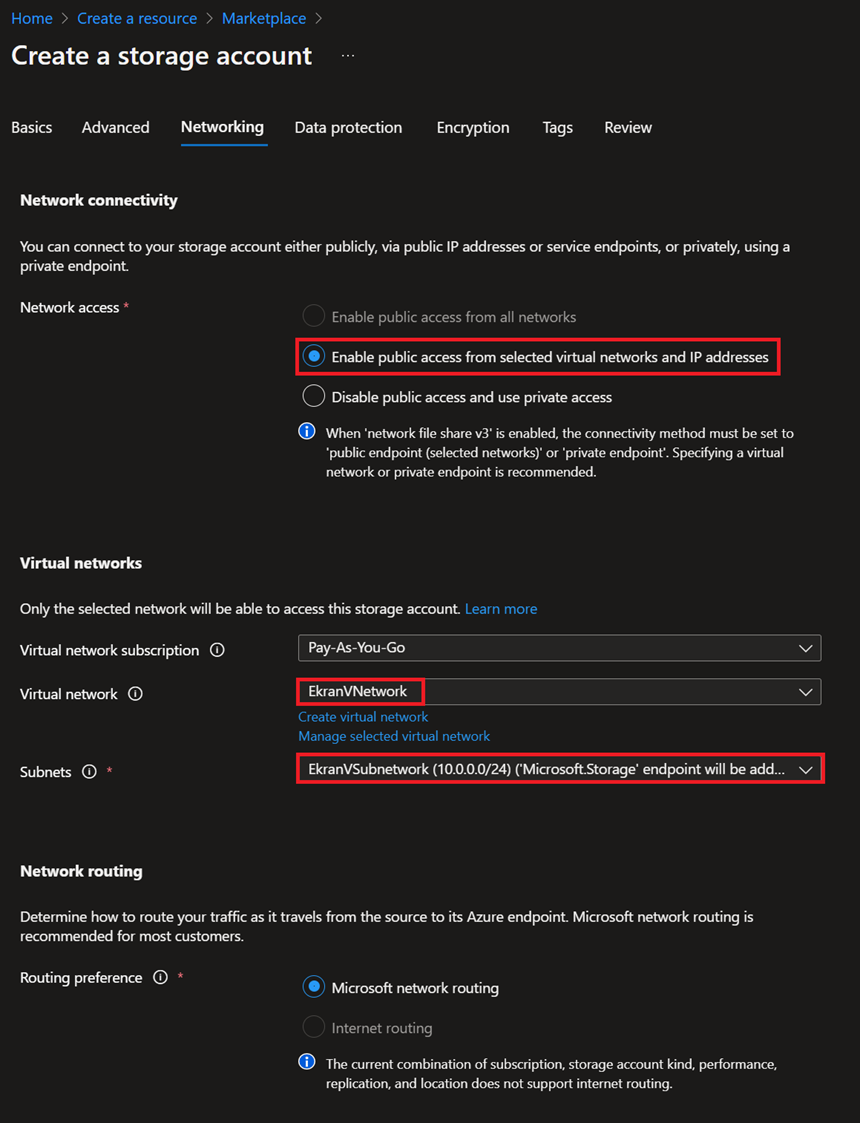
9. On the Networking page, make sure the Enable public access from selected virtual networks and IP addresses option is selected, and in the Virtual networks section, select the same virtual network that Syteca was deployed on.
10. Proceed to the Review page (where the settings on the other pages before it are optional).
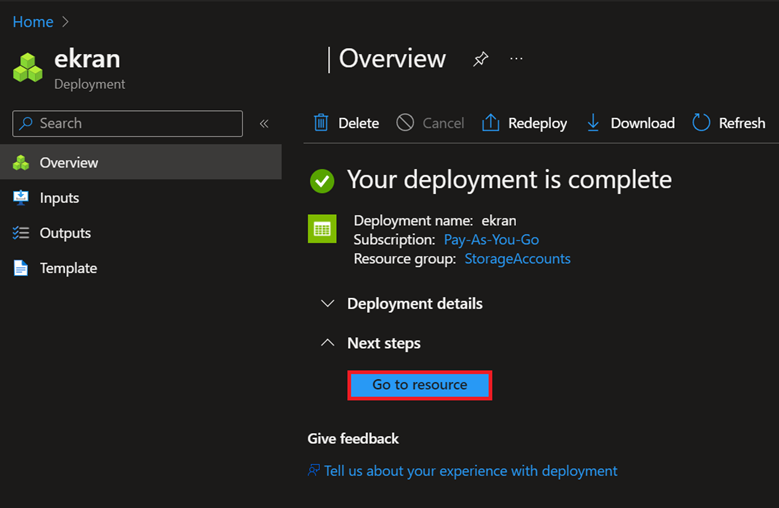
11. On the Review page, click Create, and wait until the account is deployed, and then click Go to resource to view the new account created.
2. Creating the Azure Blob Storage
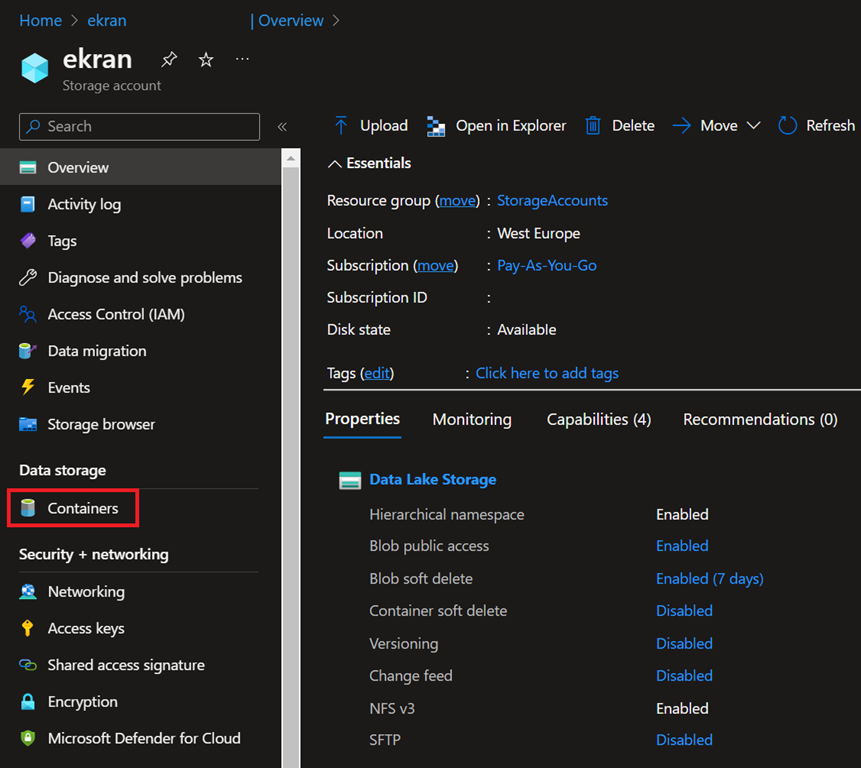
1. On the Storage account page, click Containers in the left pane.
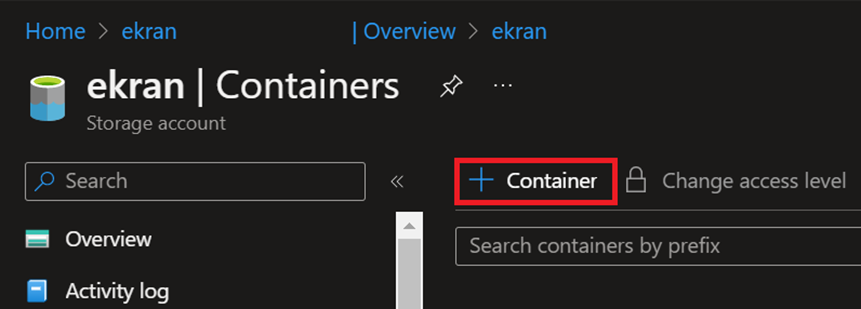
2. On the Containers page that opens, click Container to create a new container.
3. On the New container pane that opens, enter a name for the storage container, and in the Public access level drop-down menu, select Container (anonymous read access for containers and blobs).
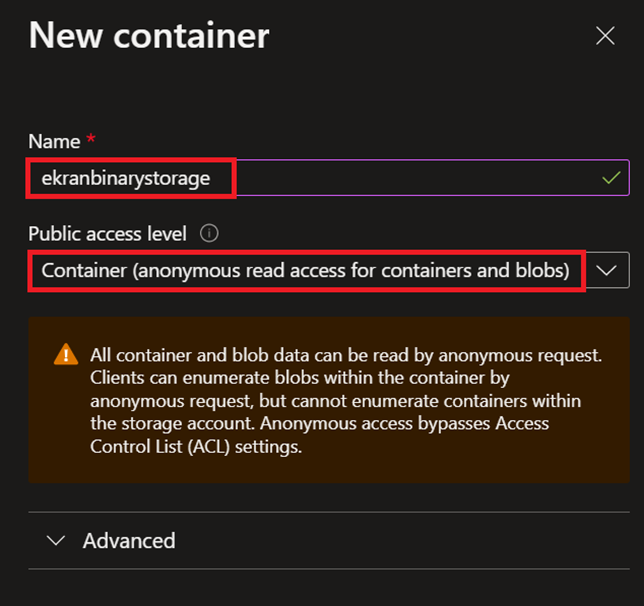
4. Click the Create button.
5. After it has been created, the storage is added to the list of containers.
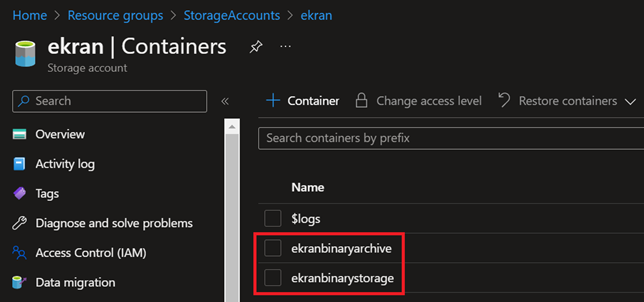
NOTE: If you also want to use the Archive & Cleanup feature, another container can be created in the same way to use as a binary data archive. See detailed information on the Archive & Cleanup feature on the Database Management section.
3. Configuring the NFS Client on the Syteca Application Server Virtual Machine
1. Log in to the virtual machine where Syteca Application Server is running.
2. Open Server Manager, and click Add roles and features.
NOTE: Server Manager can be found on the Windows Start menu.
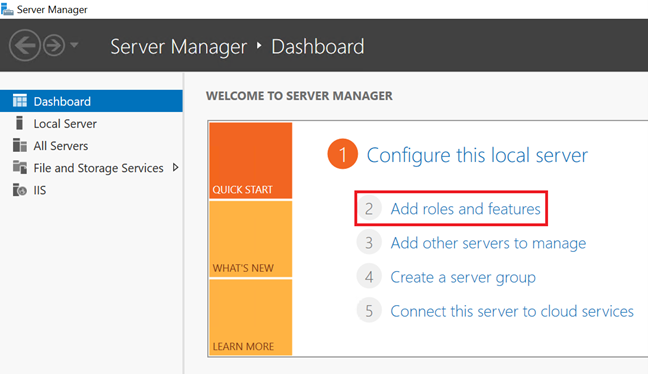
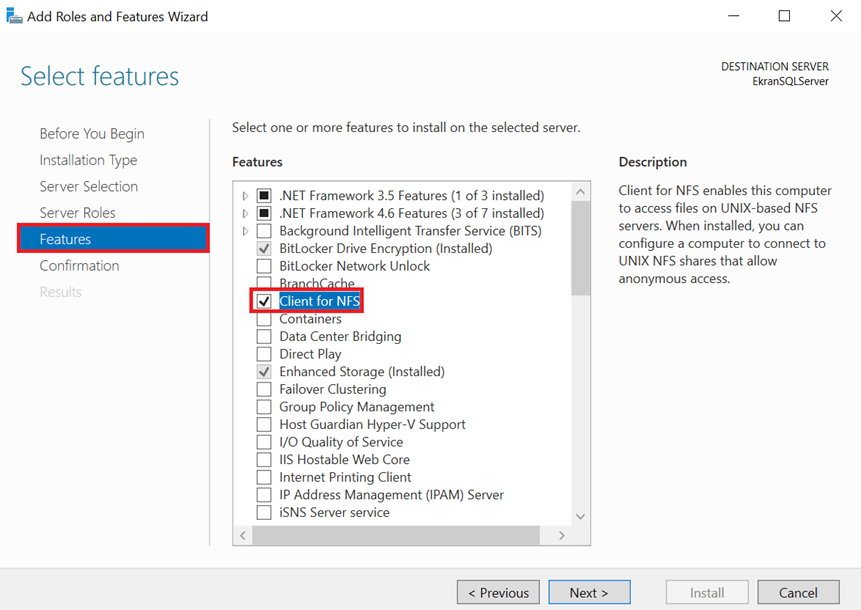
3. In the Add Roles and Features Wizard window that opens, select Features (on the left) to open the Select features page, and then select the Client for NFS feature, and click Next, and then confirm installation.
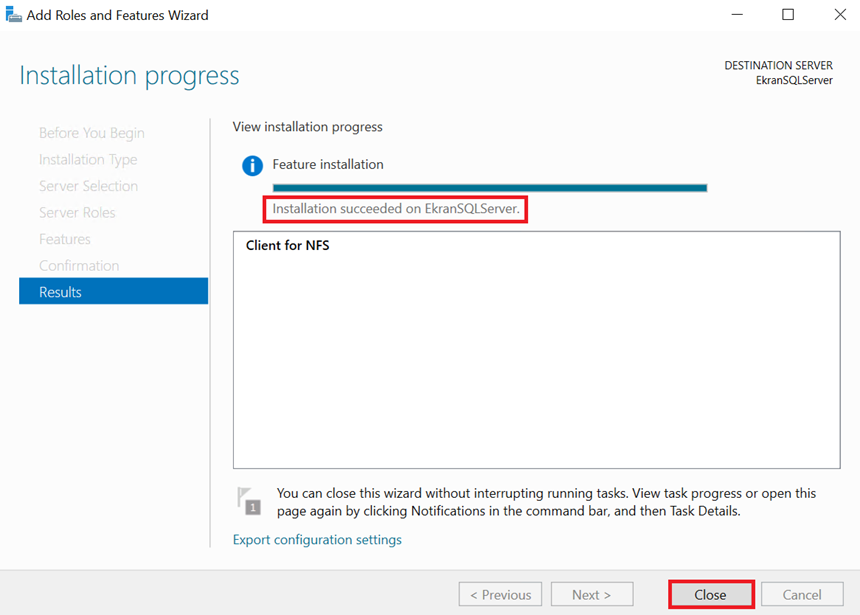
4. Click Close to close the wizard once installation is complete.
5. Open PowerShell and run the following commands to allow anonymous access via the NFS client:
New-ItemProperty -Path HKLM:\SOFTWARE\Microsoft\ClientForNFS\CurrentVersion\Default -Name AnonymousUid -PropertyType DWord -Value 0
New-ItemProperty -Path HKLM:\SOFTWARE\Microsoft\ClientForNFS\CurrentVersion\Default -Name AnonymousGid -PropertyType DWord -Value 0
6. Restart the virtual machine.
4. Configuring the Syteca Application Server Virtual Machine Connection to the Azure Blob Storage
1. Log in to the virtual machine where Syteca Application Server is running.
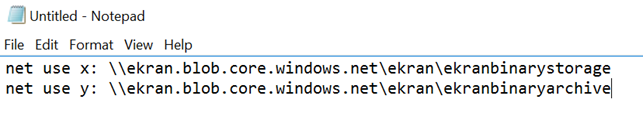
2. Open the Notepad application, and copy the following command into it, and then replace the values of “<storage-account-name>” and “<container-name>” with the names of the storage account and the container that you have created:
net use x: \\<storage-account-name>.blob.core.windows.net\<storage-account-name>\<container-name>
NOTE: If you are planning to use the Archive & Cleanup feature, and have already created another container to use for storing archived data, also add the same command for the archive storage, but use a different letter for it.
3. In the File menu of the Notepad application, select Save As, and in the window that opens, do the following:
• Select a folder or create a new one where you want to store the script permanently.
• In the File name field, enter a name for the script followed by the ".bat" extension (i.e. delimited by a dot character).
• In the Save as type drop-down menu, select All Files.
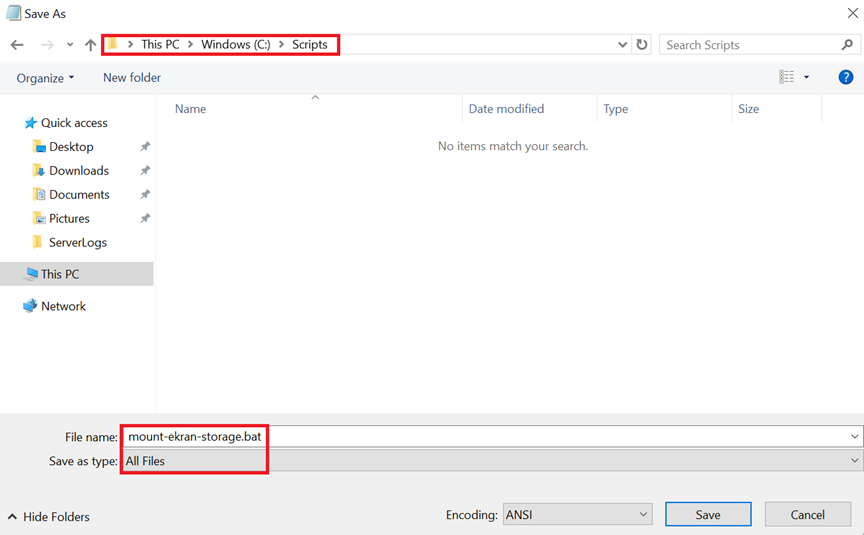
4. Click Save.
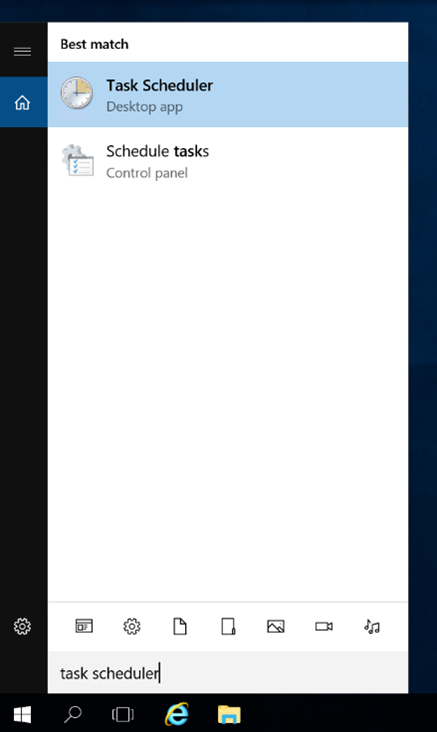
5. Open the Task Scheduler application (which can be found by using the search option on the Windows taskbar).
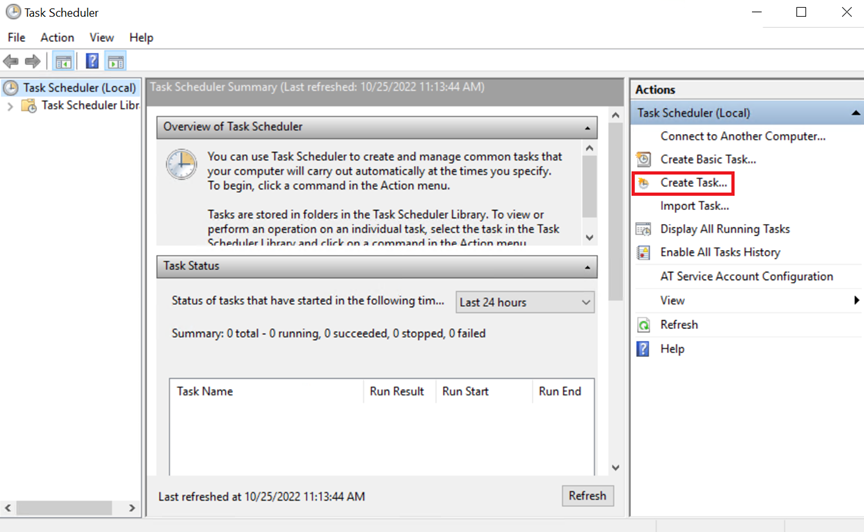
6. In the Actions pane on the right, click Create Task.
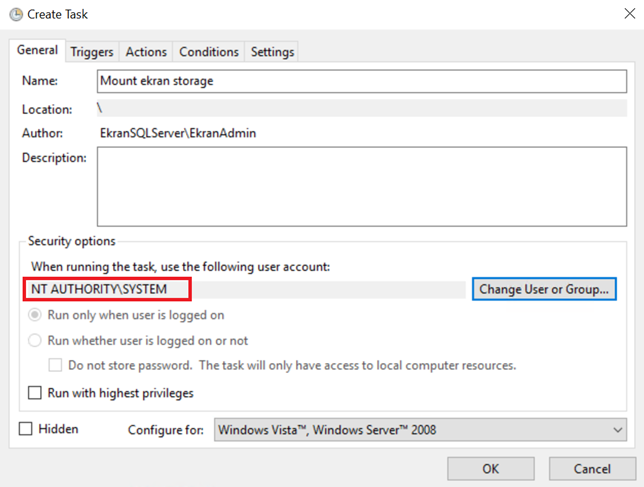
7. In the Create Task window that opens, on the General tab, enter a Name for the new task.
8. Click Change User or Group.
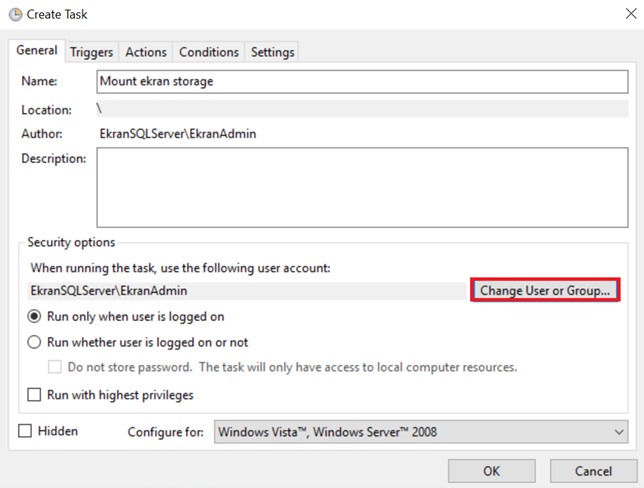
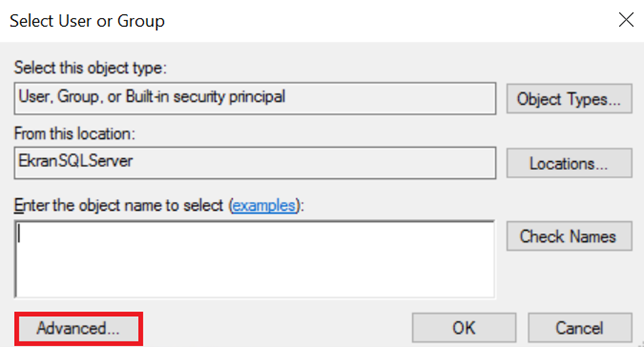
9. In the Select User or Group window that opens, click Advanced.
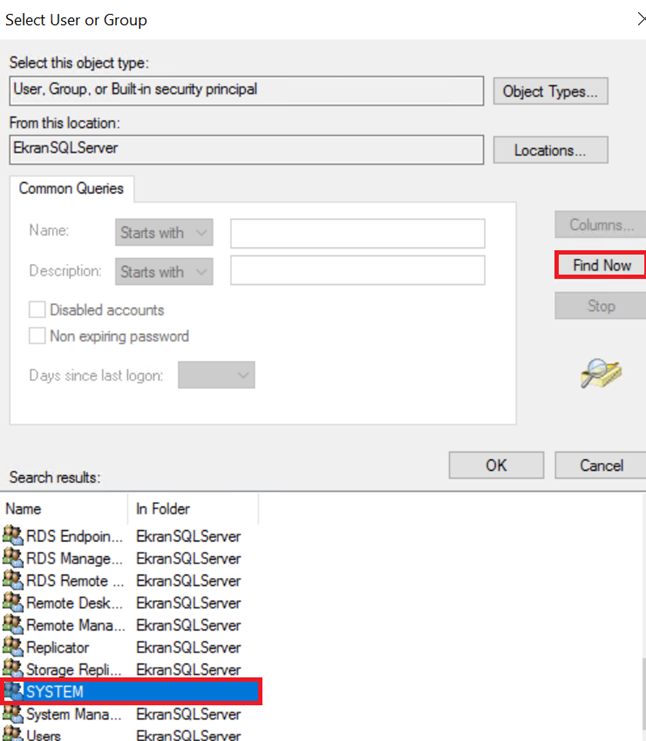
10. Click Find Now, and then select SYSTEM in the list of users and groups displayed.
11. Click OK to go back to the Create Task window, and on the General tab, check that the selected user account is displayed in the Security options section.
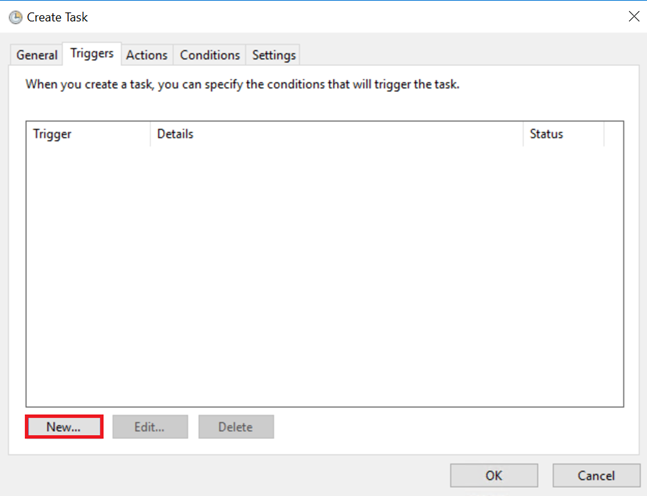
12. Select the Triggers tab in the Create Task window, and then click New.
13. In the New Trigger window that opens, select At startup in the Begin the task drop-down menu.
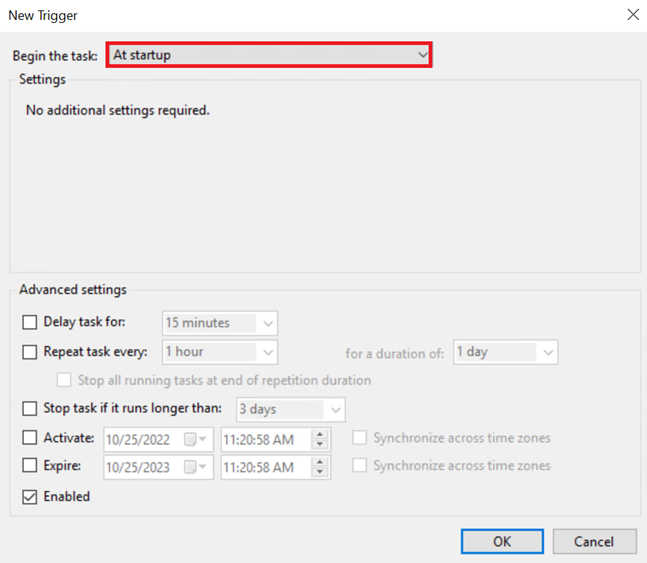
14. Click OK.
15. Select the Actions tab in the Create Task window, and then click New.

16. In the New Action window that opens, in the Action drop-down menu, select Start a program, and then in the Program/script field, enter the path to the mounting script (or use the Browse button to find it in File Explorer).
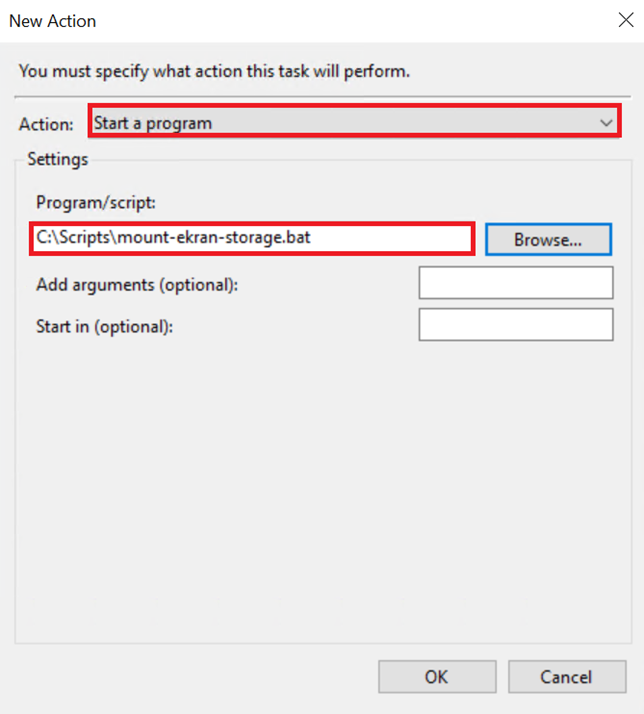
17. Click OK to complete creating the task.
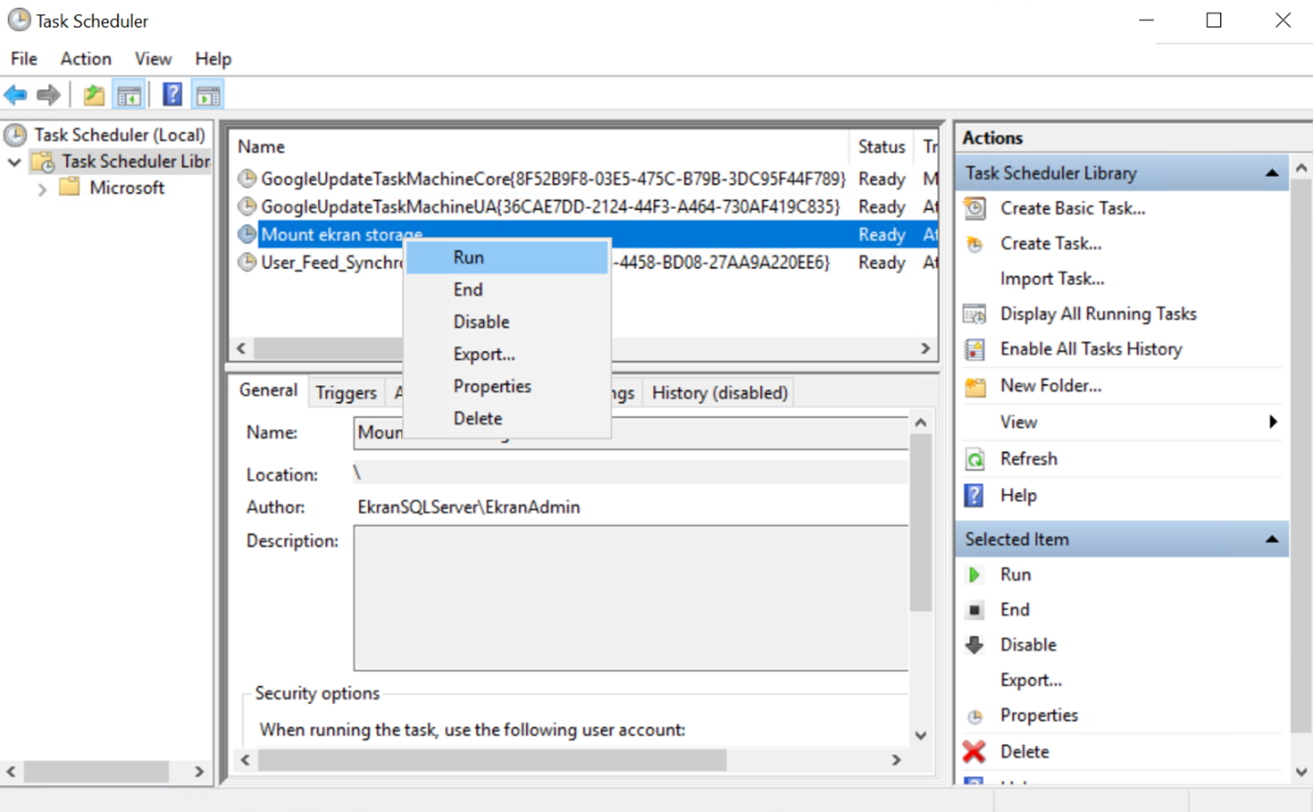
18. In the Task Scheduler window, select Task Scheduler Library in the pane on the left, and find the task created in the list, and then right click on it, and select Run.
19. In File Explorer, the connected storage should now be displayed, where each connected container has its own local drive letter (as was specified in the script).
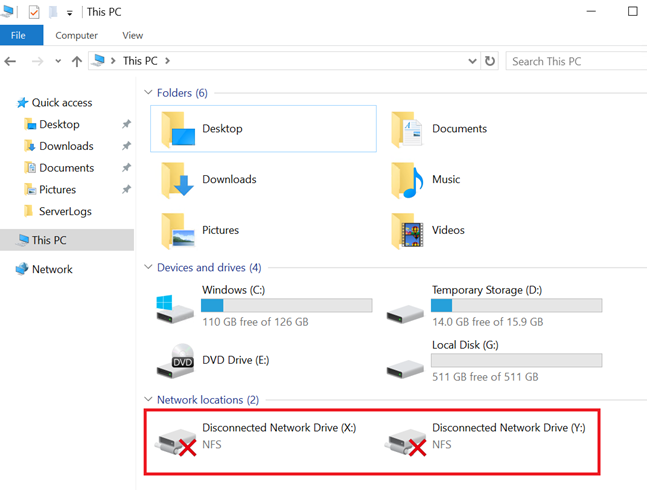
NOTE: Because the SYSTEM account was used to connect to the storage, its status is disconnected, although the storage can be browsed and used to store data.
5. Configuring Syteca to Use the Azure Blob Storage
1. Log in to the virtual machine where Syteca Application Server is running.
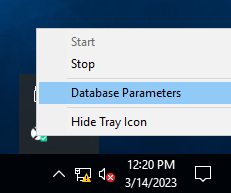
2. Find the Syteca Server tray icon in the Windows system tray (on the right side of the taskbar), and then right click on it, and select Database Parameters.
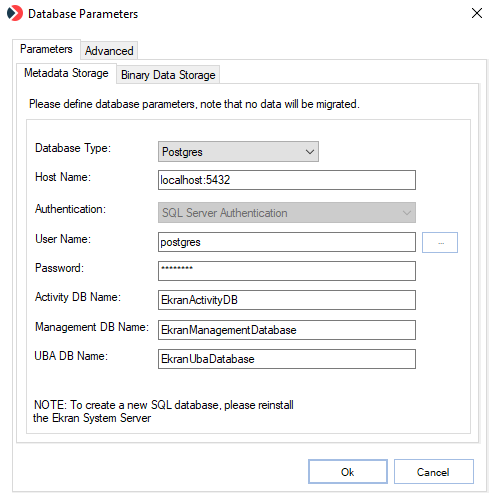
3. In the Database Parameters window that opens, on the Parameters tab, select the Binary Data Storage sub-tab.
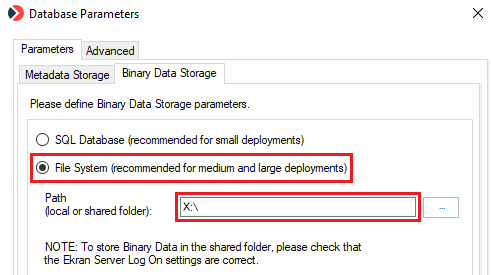
4. Select the File System option, and specify the Path to the connected storage location to be used for the binary data.
5. Click Ok, and agree to restart the EkranServer service when prompted.
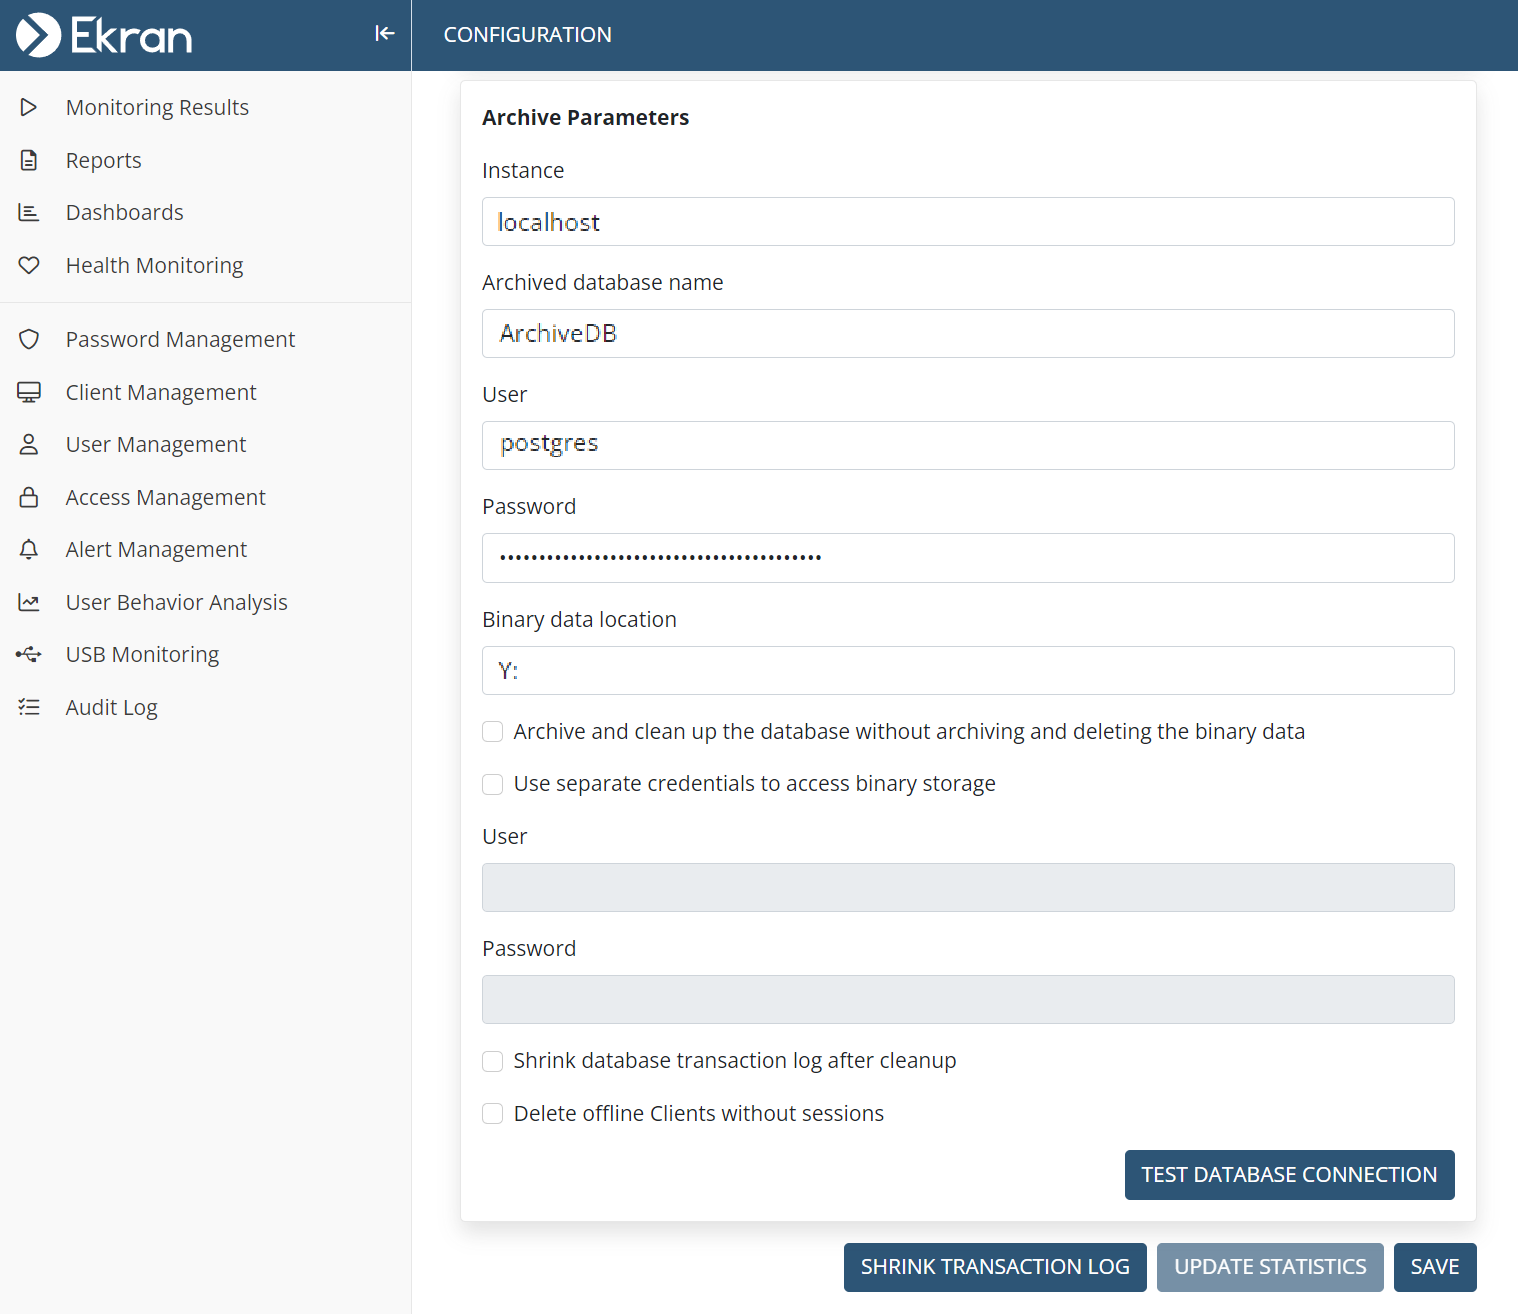
6. In the event that you also created another container for archived data, do the following:
a) Open the Management Tool in a browser, and log in.
b) Open the Configuration page, by clicking the Configuration (.png?inst-v=362ca448-a20b-4783-93c2-f49186888f5c)
c) Select the Database Management tab.
d) In the Archive Parameters section, enter the database server parameters, and the path to the connected storage location (container) to be used to store the archived data.
e) Click the Test Database Connection button to check the connection, and then click the Save button (at the bottom of the page).