
How Can I Create a Self-Signed SSL Certificate for TLS (Splunk)?
SytecaSyteca
Follow the steps below to generate a self-signed certificate for the Splunk SIEM system.
Table of Contents
1. Prerequisites
1. Log in to the Splunk server.
2. Change to directory to the $SPLUNK_HOME\etc\auth Splunk installation directory, by using the following command:
cd /opt/splunk/etc/auth/ |

3. Make a call to the myCerts directory, by using following the command:
mkdir myCerts |

4. Change to directory to the myCerts directory:
cd myCerts |

2. Create a Root Certificate Authority
1. Create a Certificate Authority Private Key, by using the following command:
openssl genrsa -aes256 -passout pass:1234 -out myCAPrivateKey.key 2048 |

NOTE: Replace “1234” in the “pass” parameter with your password.
2. Remove the key phrase from the private key, by using the following command:
openssl rsa -passin pass:1234 -in myCAPrivateKey.key -out myCAPrivateKey.key |

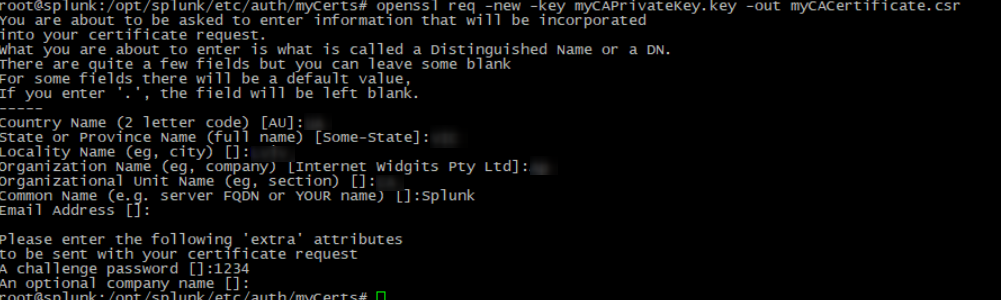
3. Create a root certificate request, by using the following command:
openssl req -new -key myServerPrivateKey.key -out myServerCertificate.csr |
4. Enter your data into the corresponding fields:
5. Sign the certificate request, by using the following command:
openssl x509 -req -in myCACertificate.csr -sha512 -signkey myCAPrivateKey.key -CAcreateserial -out myCACertificate.pem -days 1095 |

3. Create a Server Certificate
1. Create a server private key, by using the following command:
openssl genrsa -aes256 -passout pass:1234 -out myServerPrivateKey.key 2048 |

2. Remove the key phrase from the private key, by using the following command:
openssl rsa -passin pass:1234 -in myServerPrivateKey.key -out myServerPrivateKey.key |

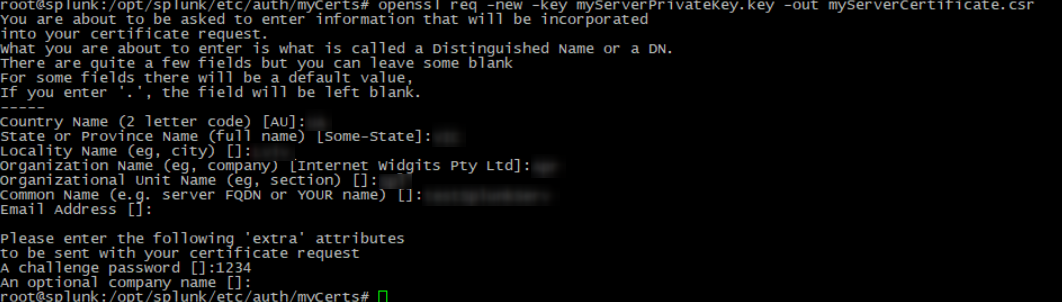
3. Create a server certificate request, by using the following command:
openssl req -new -key myServerPrivateKey.key -out myServerCertificate.csr |
4. Enter your data values into the corresponding fields:
5. Sign the server certificate request, by using the following command:
openssl x509 -req -in myServerCertificate.csr -sha256 -CA myCACertificate.pem -CAkey myCAPrivateKey.key -CAcreateserial -out myServerCertificate.pem -days 1095 |

4. Import the Response
Import the response, by using the following command:
cat myServerCertificate.pem myServerPrivateKey.key myCACertificate.pem mySplukServerCertificate.pem |

5. Update the Splunk Configuration
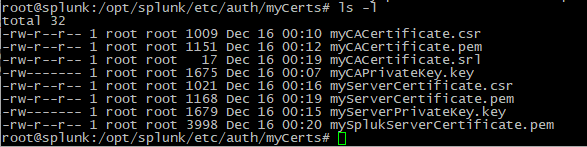
The following certificate files should now exist in the myCerts directory:
Root CA Files
myCACertificate.csr
myCACertificate.pem
myCACertificate.srl
myCAPrivateKey.key
Server Certificate Files
myServerCertificate.csr
myServerCertificate.pem
myServerPrivateKey.key
mySplukServerCertificate.pem
6. Update the Splunk SSL Settings
1. Open the /opt/splunk/etc/system/local directory, by using the following command:
cd /opt/splunk/etc/system/local |

2. Open the inputs.conf file:
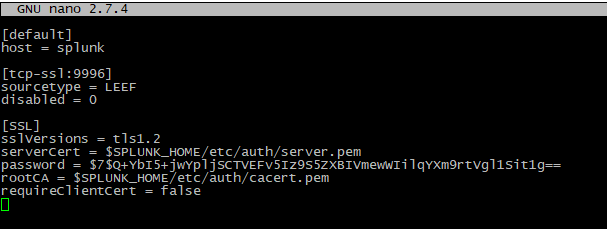
3. Replace the information in the file with the following:
[default] |
NOTE: The password "1234" indicated above is a simple example for illustrative purposes only. After rebooting the machine, the password will be encrypted automatically.

4. Save the changes and close the file.
5. Restart the machine on which Splunk is installed.
6. Check that the configuration is correct, by entering the following command after restarting the machine:
netstat -tulpn |
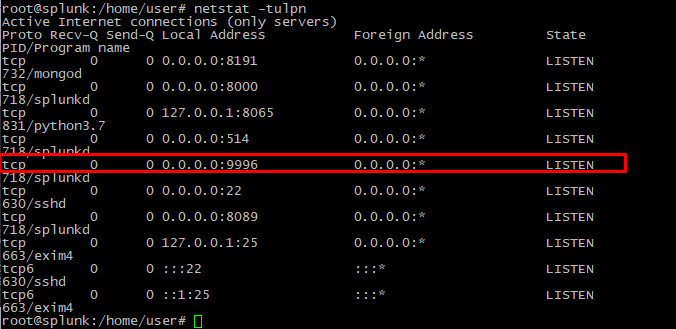
7. If all the parameters in the config file are set correctly, then port 9996 will be displayed.
7. Import the Certificate
This certificate will be needed for the Management Tool to configure the SIEM integration with Splunk. To import the certificate, do the following:
1. Change to directory to the $SPLUNK_HOME\etc\auth directory, by using the following command:
cd /opt/splunk/etc/auth/ |
2. Open the myCerts directory, and convert the mySplukServerCertificate.pem certificate to mySplukServerCertificate.cer, by using the following command:
openssl x509 -outform der -in mySplukServerCertificate.pem -out mySplukServerCertificate.cer |
3. Copy the mySplukServerCertificate.cer certificate over to a computer on which the Management Tool is installed.