Transferring Files Using the WinSCP Application
The File Transfer feature allows users of secrets to transfer files between the computer with the Syteca Connection Manager and the remote computer (i.e. the computer with the account that the secret accesses) via the Syteca Connection Manager by using the WinSCP (Windows Secure Copy) version 6.0 or higher application (which must first be installed, and added to the PATH environment variable, on the Client computer).
When the File Transfer feature is configured for a secret, and the permissions are enabled for a user of a secret, the user is able to transfer files to/from the remote computer by way of this secret in the WCP application, instead of directly connecting to the remote computer (by clicking the Connect button) in the Syteca Connection Manager.
This feature is only available for the following types of secrets, where the following File Transfer Protocols are available:
| Secret Type | File Transfer Protocol | ||
| SCP | SFTP | FTP | |
|---|---|---|---|
Active Directory account |
| ||
| Windows account | |||
| Unix account (SSH) | |||
NOTE: For the Active Directory account and Windows account secret types only]: When using the SFTP protocol, OpenSSH server needs to be installed on the remote computer (i.e. on the computer with the account that the secret accesses), or when using the FTP protocol, FTP server needs to be installed on the remote computer.
NOTE: For the Unix account (SSH) account secret type only]: When using the SFTP protocol or the SCP protocol, OpenSSH Server needs to be installed on the remote computer (i.e. on the computer with the account that the secret accesses).
Table of Contents
1. Configuring File Transfer for Users of a Secret
To enable and configure this feature for specific users of an account secret, do the following:
1. Log in to the Management Tool as an Admin User with the Management Tool Access administrative permission.
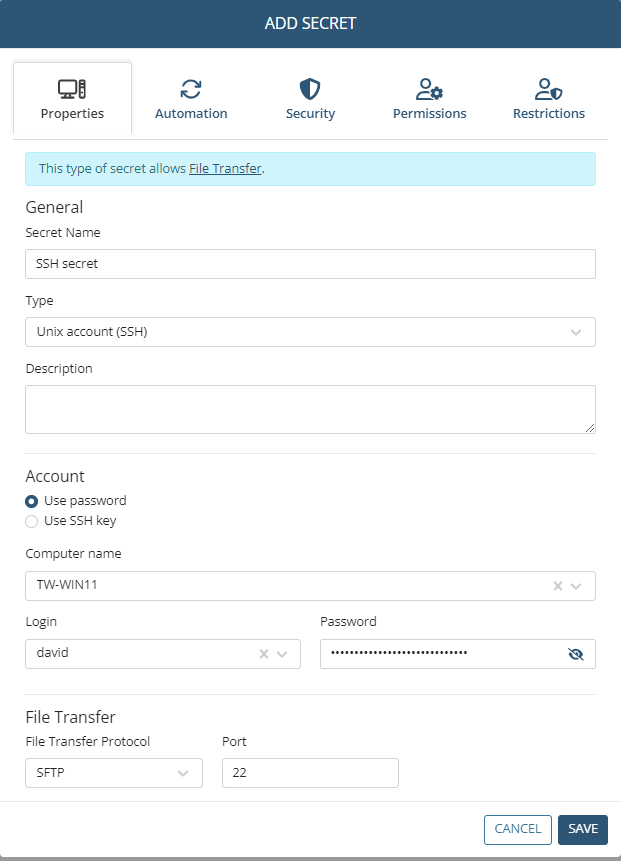
2. Add a new secret, or edit an existing secret.
3. [For Windows account and Unix account (SSH) secret types only]: On the Properties tab, in the File Transfer section (at the bottom), select both:
• The File Transfer Protocol to be used for the connection(which is SFTP by default) in the drop-down list.
NOTE: [For Unix account (SSH) secrets only:] The "FTP" protocol cannot be used together with the "Use SSH key" option.
• Enter the Port to be used for the connection (or if not specified, the default value used is: 22 for SFTP or SCP, or 21 for FTP).
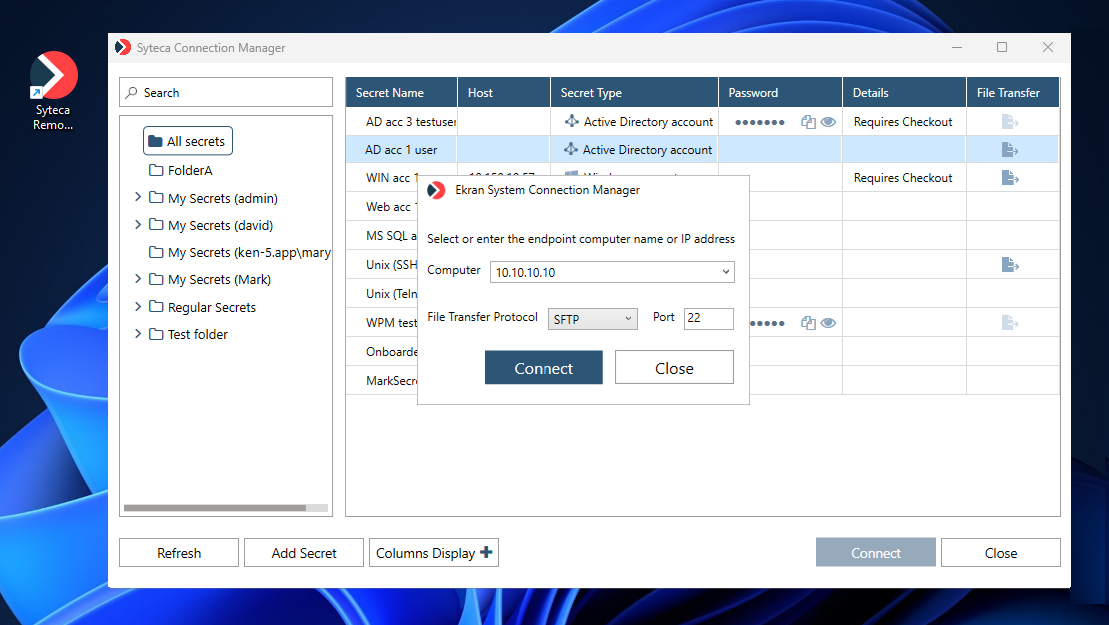
NOTE: [For the Active Directory account secret type only:] The File Transfer Protocol and Port are instead entered in a popup window displayed while connecting to the WinSCP application via the Syteca Connection Manager (along with the name of the computer or its IP address) - see below.
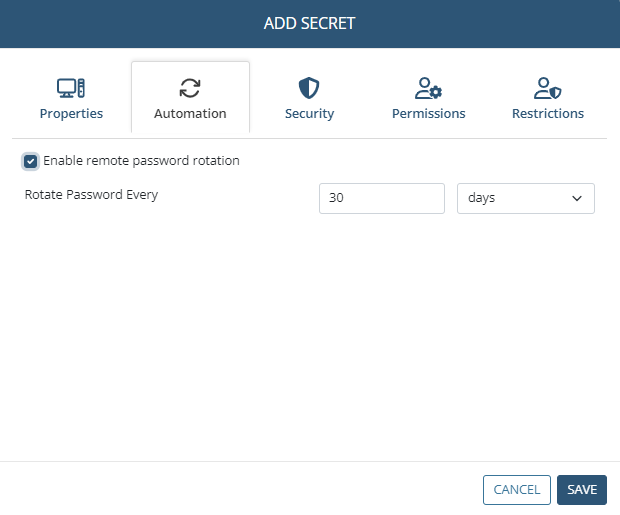
4. On the Automation tab, select the Enable remote password rotation checkbox, and specify the frequency of rotation of the secret’s password.
NOTE: The File Transfer functionality will not work until the secret's password has been rotated at least once, or if Remote Password Rotation has failed.
NOTE: If Remote Password Rotation ever fails, the secret is marked with the red circular (
5. On the Security tab, select both the Requires check out and Change password on check in checkboxes.
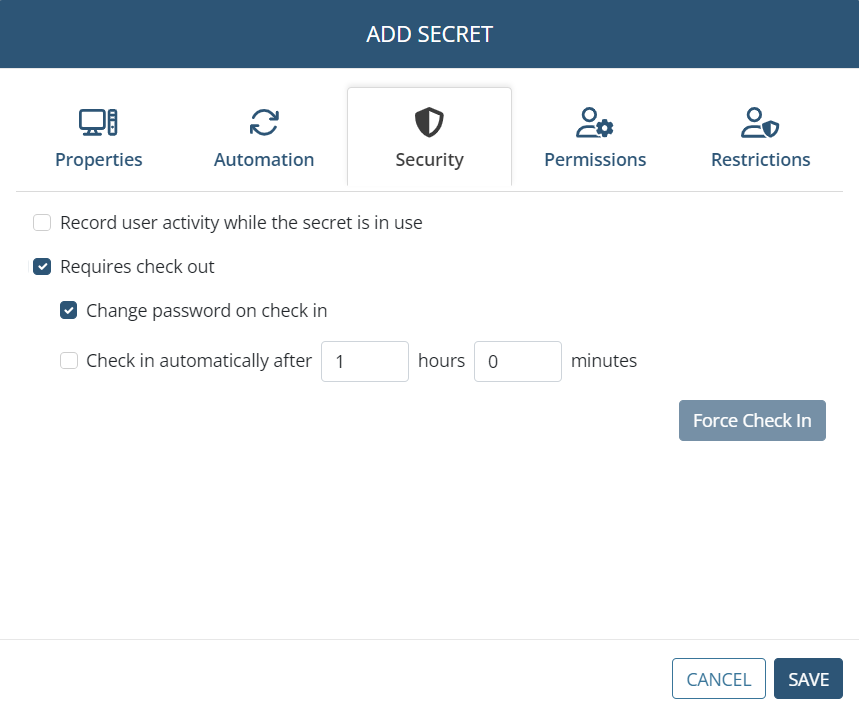
NOTE: The File Transfer feature will not work if these 2 checkboxes are not selected, and it will not be possible to save the secret after enabling the File Transfer permissions for at least one user.
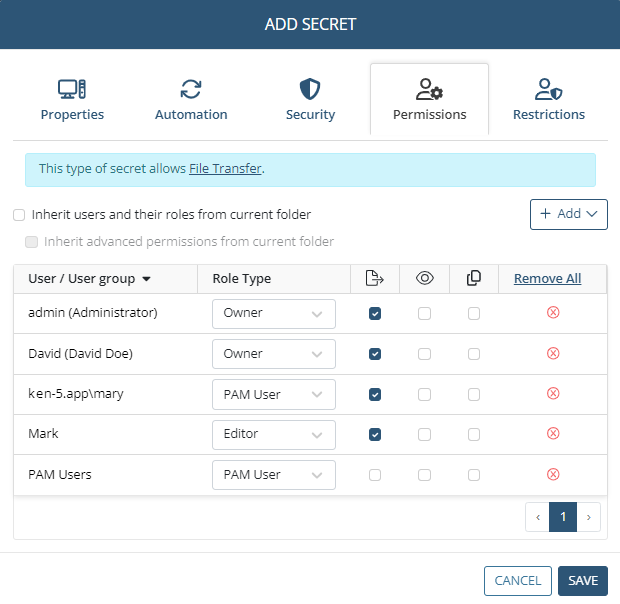
6. On the Permissions tab, add the required users (and/or user groups) who will be able to use the secret, along with the permissions to be granted to each of them, as follows:
• Click the Add button, and in the drop-down list that opens, search for and select each of the required users / user groups.
• For each user / user group added to the list (displayed in the grid), select the permissions to be granted to each of them, in the following columns:
- Role Type: Select either the Owner or Editor Role Type permissions.
- File Transfer (

NOTE: Alternatively, the users / user groups who will be able to use the secret, along with their permissions, can be inherited from the parent folder if configured appropriately in this folder (except from the "All secrets" folder) by selecting the "Inherit users and their roles from current folder" checkbox (to inherit the users / user groups along with their Role Type permissions from the current folder) and the "Inherit advanced permissions from current folder" checkbox (to inherit the "File Transfer" advanced permissions for the users / user groups from the current folder).
7. Click the Save button to save the secret.
8. Either:
• Make sure the secret's password has been rotated automatically at least once.
• Edit the secret, and on the Automation tab, click the Rotate Now button.
NOTE: The Rotate Now button is not displayed while adding a secret, but is only available while editing a secret later, after the secret have been added.
9. Click the Save button to save the secret.
2. Transferring Files Between Computers
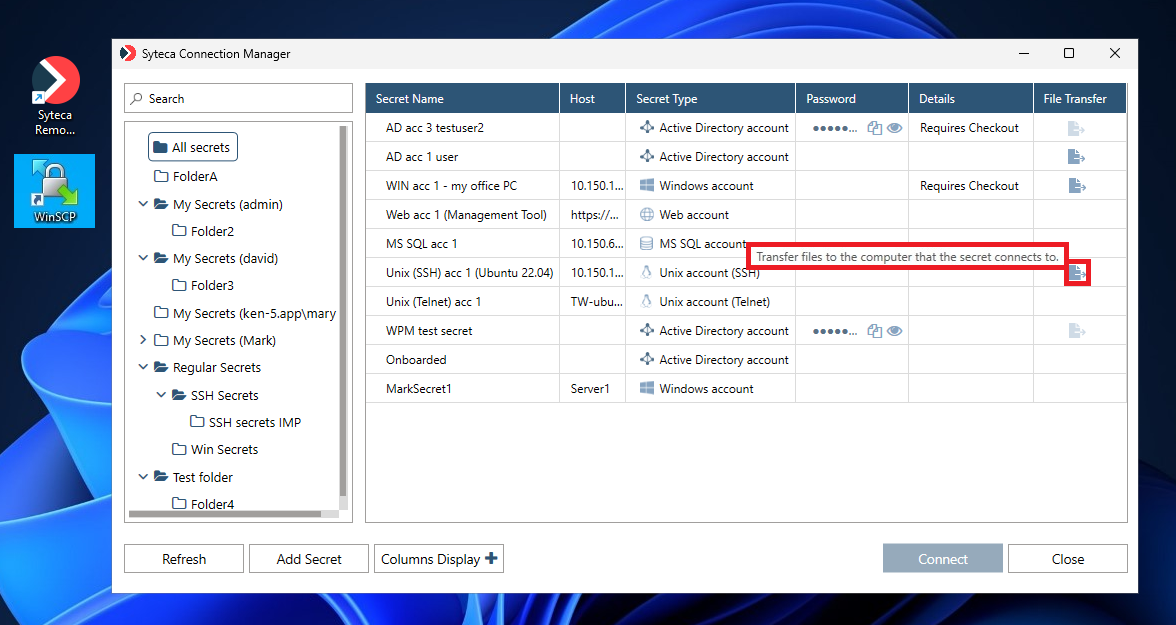
To transfer files between the computer with the Syteca Connection Manager and the remote computer that the secret connects to, do the following:
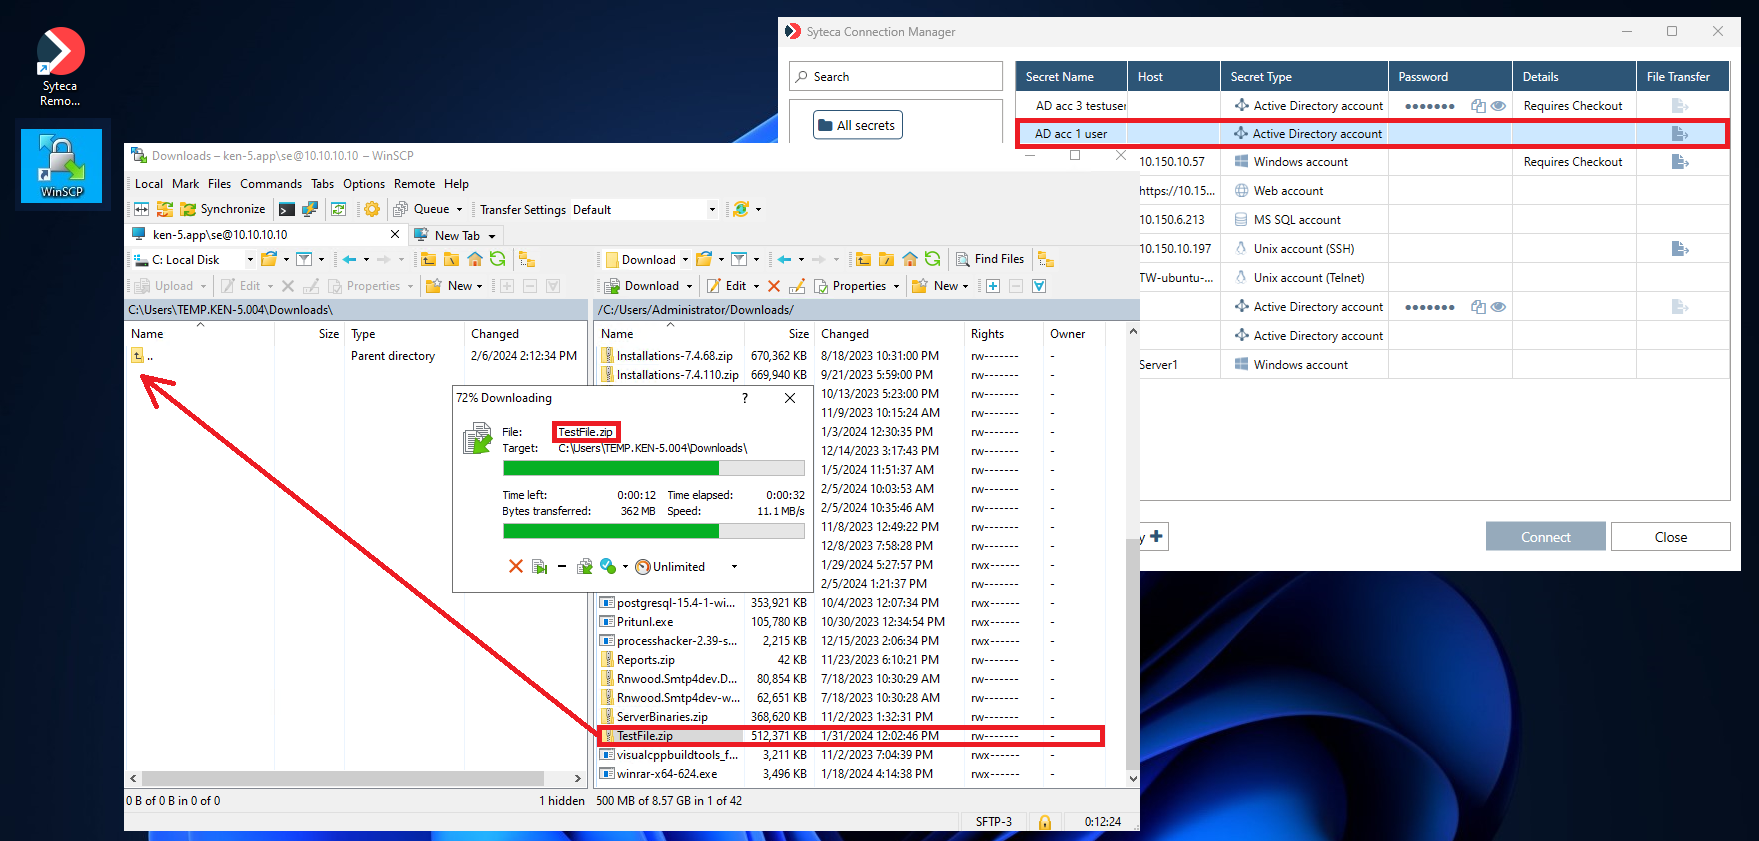
1. In the Syteca Connection Manager, instead of clicking the Connect button, click the dark blue (

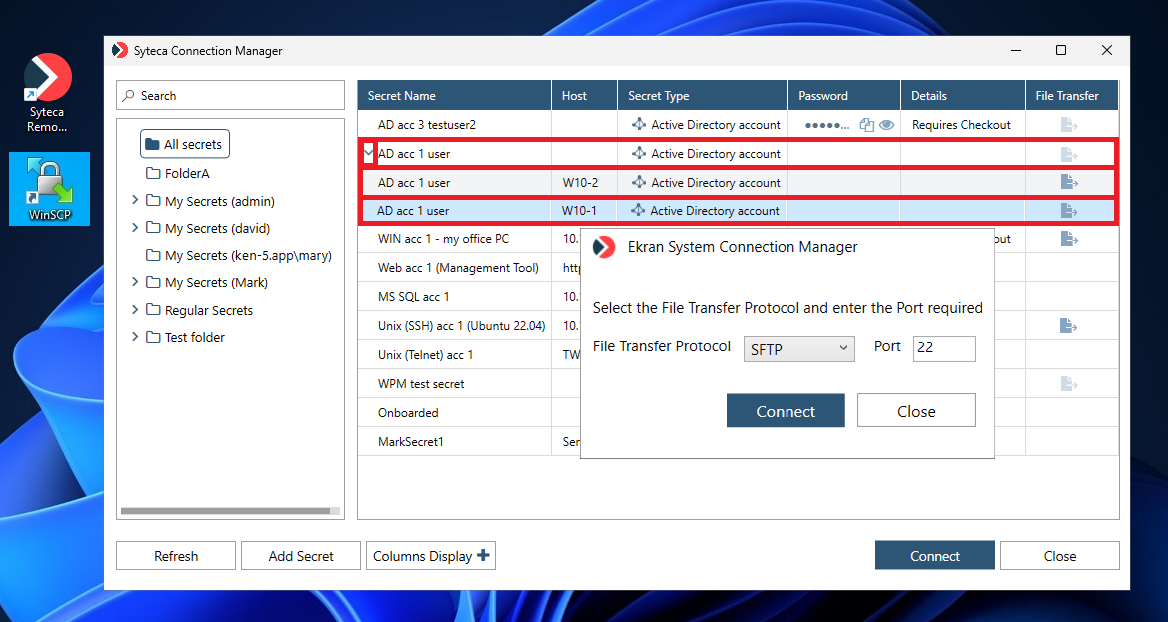
2. [For the Active Directory account secret type only:] In the popup window that opens, enter the name of the host (e.g. remote) Computer to connect to (or its IP address), and select the File Transfer Protocol and enter the Port required (or use the default values shown) - see above - and then click the Connect button.
NOTE: [For the Active Directory account secret type only:] If connections are only allowed to specific computers in the domain, the “parent” secret first needs to be expanded (by clicking the down-arrow (
3. The WinSCP application then opens (if version 6.0 or higher is installed) on the Client computer, and files can be transferred between the computer with the Syteca Connection Manager and the remote computer by using the WinSCP application.