
Getting Started with Password Management
The Password Management feature (along with the Account Discovery feature) is an integral part of Syteca's Privileged Access Management (PAM) functionality. It allows the credentials of shared privileged accounts to be securely stored and managed in account secrets (where these credentials are stored in encrypted form in the database), and role-based access control to be implemented. The system supports the JIT (Just-in-Time) PAM approach.
NOTE: This feature is only available with an activated product license serial key that includes the Password Management application and features, and PAM seat licenses.
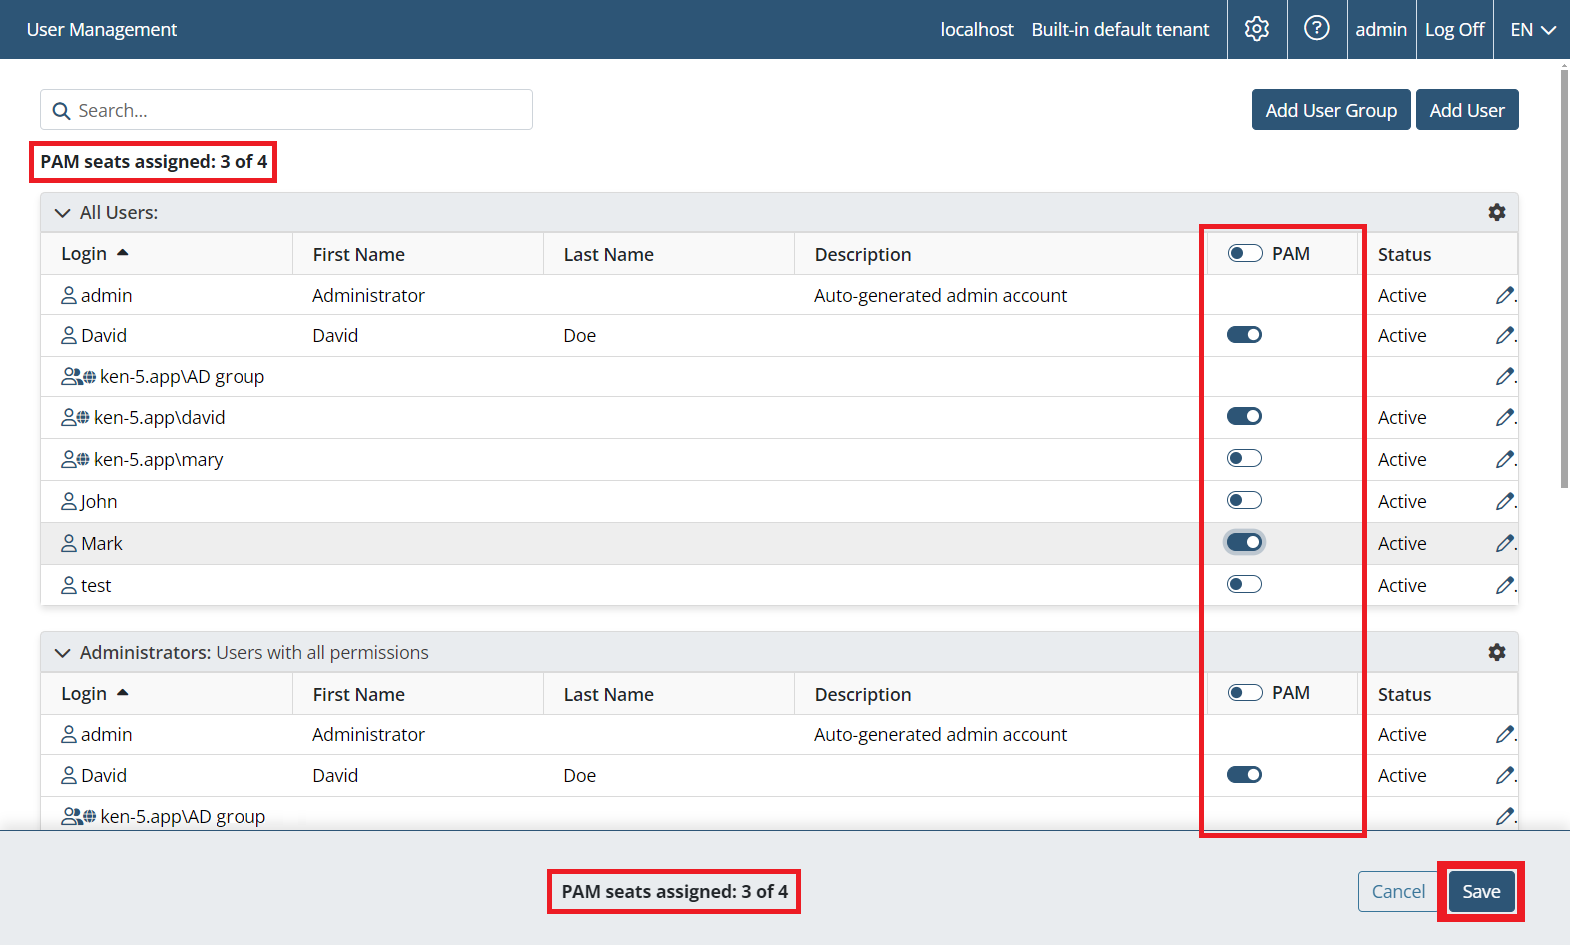
NOTE: PAM seat licenses first need to be assigned to users (on the Users page) for them to be able to use the PAM functionality (i.e. for users to get access to both the Password Management and the Account Discovery pages in the Management Tool, and to the Syteca Connection Manager on a Windows computer used as a jump server to connect to the privileged accounts by using the corresponding account secrets.
NOTE: The Syteca Connection Manager requires .NET Framework 4.8 to be installed on the Client computer (i.e. the computer with the Syteca Connection Manager).
Follow the steps below to configure the Password Management options for using secrets.
Table of Contents
1. Configuring the Client Computer
To configure a Windows Client computer (with the Syteca Connection Manager enabled), do the following:
1. Log in to the Management Tool, and click the Client Management navigation link (on the left).
2. Click the Client Management navigation link (on the left).
3. On the Client Management page that opens, find the Windows Client that will be used as the jump server Client computer, and click its name in the Client Name column.
NOTE: A jump server computer is only required if two or more concurrent sessions are required on the Client computer with the Syteca Connection Manager, and it is recommended to use a Windows Server operating system for the correct functioning of the Syteca Connection Manager on a jump server computer.
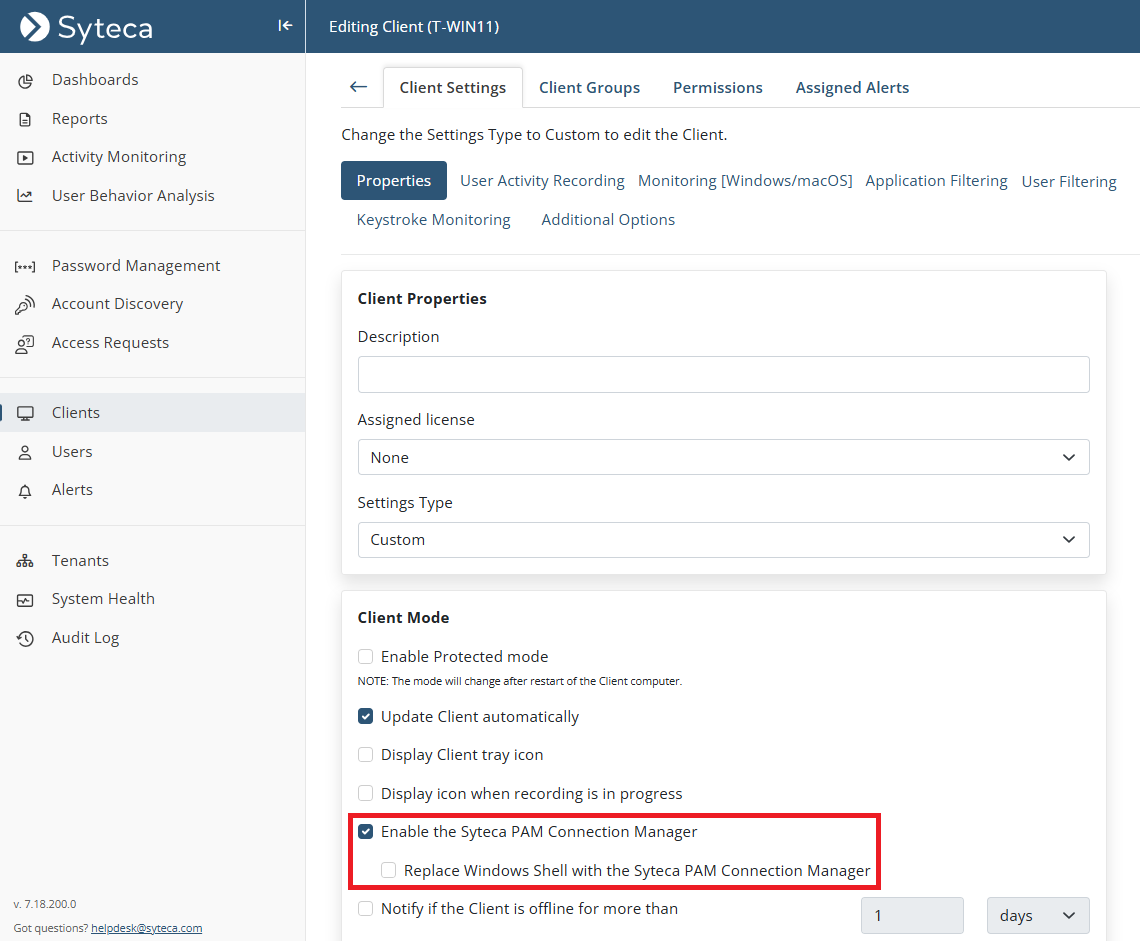
4. On the Properties tab that opens, scroll down to Client Mode section, and select the following checkbox(es):
• Enable the Syteca PAM Connection Manager: To enable the Syteca Connection Manager on the Client computer.
• Replace Windows Shell with the Syteca PAM Connection Manager: To optionally only display the open Syteca Connection Manager window to users (i.e. without the Client computer's desktop).
5. The Syteca Connection Manager is then enabled for use.
NOTE: When using a custom Windows shell, the Syteca Connection Manager application (shortcut icon) may not be displayed on the desktop, but can be found in the C:\Users\Public\Desktop folder.
6. To finalize configuration of the Client, select the Authentication Options tab, and scroll down to the Two-Factor and Secondary Authentication section, then select the Enable secondary user authentication on login checkbox to allow users of the Client machine to access secrets.
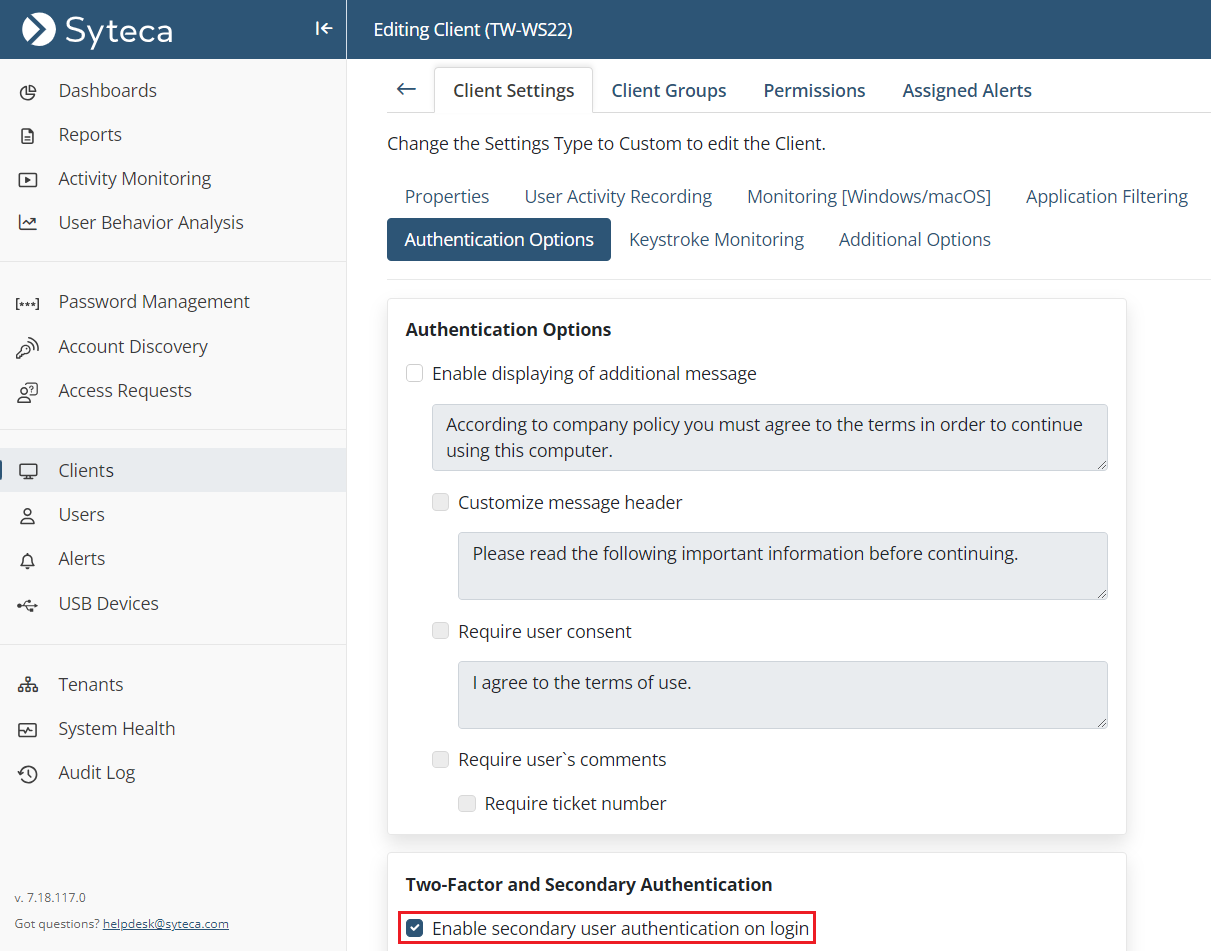
NOTE: It is not required to enable secondary user authentication for Active Directory users.
7. Click the Finish button to apply the changes.
8. The Client as then configured (on which users will be able to connect to the accounts in the corresponding secrets by using the Syteca Connection Manager).
2. Adding and Configuring Secrets
The credentials of shared privileged accounts are stored in secrets.
To create and configure any type a secret (to be used to manage and access a privileged account), do the following:
1. Log in to the Management Tool, and click the Password Management navigation link (on the left).
2. On the Password Management page that opens, on the Secrets tab, click the Add button (in the top right of the page).
NOTE: Only users specifically added to the Management Tool as separate users, but not those only belonging to an Active Directory user group added, can add secrets/folders (please refer the Management Tool Issues and Error Messages page for more information).
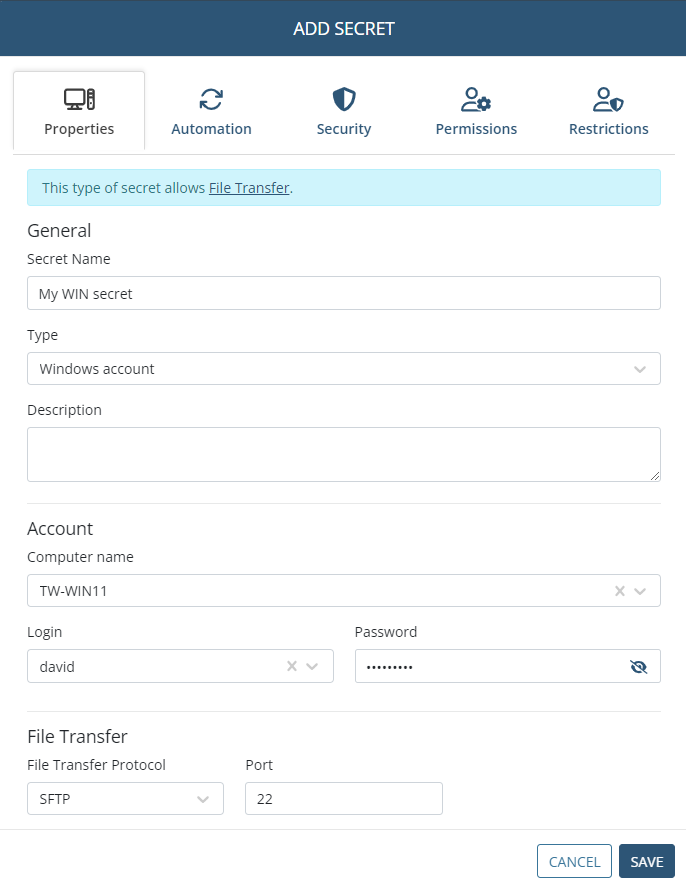
3. In the Add Secret pop-up window that opens, on the Properties tab, specify the following:
• Secret Name: Enter a unique name for the secret.
• Secret Type: Select the type of secret required (Active Directory account / Windows account / Unix account (SSH) / Unix account (Telnet) / Web account / MS SQL account).
• Description: Enter a description for the secret (optional).
• Current folder: If required, change the folder where the secret will be stored (in the Tree-View folder structure).
4. In the Account section, specify one of the following for the remote account on the host (e.g. remote) computer that users of the secret will connect to by using the Syteca Connection Manager:
• Enter (or select in the drop-down list displayed) the following (depending on the type of secret):
- Domain: The Active Directory domain name.
- Computer name: The hostname (or IP address) of the computer.
- URL: The URL.
- Server: The hostname (or IP address) of the computer with the MS SQL database (where the port can also be specified, separating them with a comma).
• Login: Enter the secret's login name, which must be the existing user name of the account to be accessed by using the secret.
• Password: Enter the secret's password, which must be the existing password for the account to be accessed by using the secret.
• [For the Active Directory account secret type only:] Select specific computers for which connections will be allowed: Select this checkbox, and then select the required Computers in the drop-down list below it, to only allow access to specific computers (in the Domain specified above).
NOTE: [For the Unix account (SSH) secret type only:] The "Use SSH key" option can also be selected, in which case, instead of entering a Password for the account, a .PPK file containing the Private Key needs to be uploaded, and the Private Key Passphrase entered.
NOTE: [For the Windows account and Unix account (SSH) secret types only:] In the File Transfer section, if this functionality is to be used, please refer to the Transferring Files Using the WinSCP Application page.
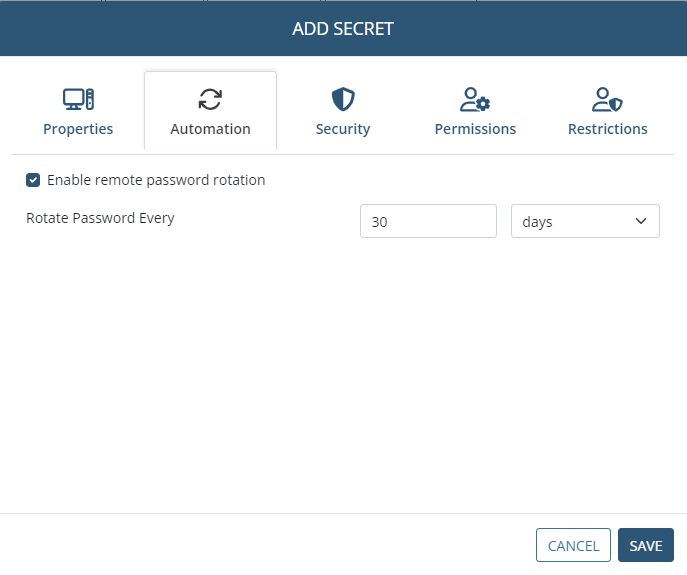
5. [For the Active Directory account, Windows account, Unix account (SSH), and MS SQL account secret types only:] On the Automation tab, if the Remote Password Rotation functionality is to be used, do the following:
• Enable remote password rotation: Select this checkbox to allow the account's password (and the secret's password, which is the same) to be changed automatically (and manually at any time).
NOTE: After a secret is added, when editing it later, the Rotate Now button is also displayed on the Automation tab, which can be clicked at any time to manually change the account's password at any time.
• Rotate Password Every: Select the frequency at which the account's password will be changed automatically.
NOTE: [For the Windows account and Unix Account (SSH) secret types only:] For Remote Password Rotation to work, the preconditions first need to be met on the remote computer where the account is located (i.e. on the computer that the secret connects to by using the Syteca Connection Manager).
NOTE: If Remote Password Rotation ever fails, the secret is marked with the red circular (
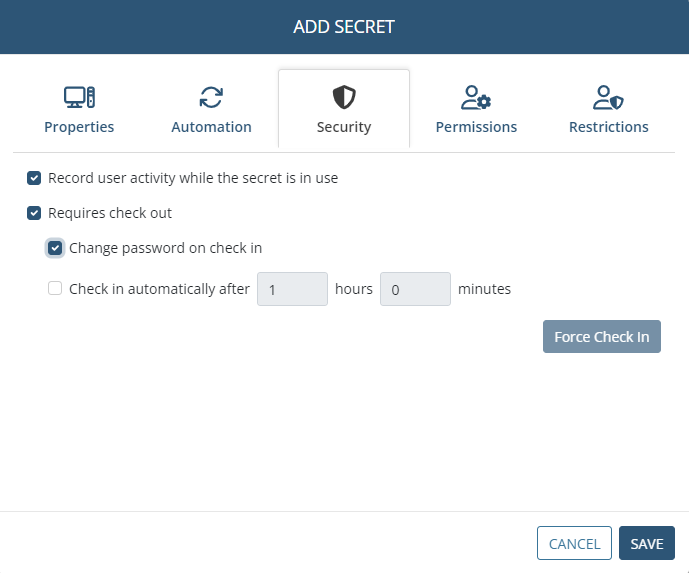
6. On the Security tab, user activity recording when the secret is being used can be enabled, and security can be enhanced by enabling the Password Checkout functionality so that only one user will be able to use the secret at any given time, along with several other options for the Password Checkout functionality, as follows:
• Record user activity while the secret is in use: Select this checkbox to enable user activity to be recorded only whenever the secret is in use (i.e. whenever a user is connected to the corresponding account on the host (e.g. remote) computer by using the Syteca Connection Manager). For more detailed information, please refer to the Adding Secrets page.
• Requires check out: Select this checkbox to enable the Password Checkout functionality, so that only one user can check out the secret's password (i.e. can connect to the account that the secret connects to) at any given time.
• [For the Active Directory account, Windows account, Unix account (SSH), and MS SQL account secret types only:] Change password on check in: Select this checkbox for the password to be rotated every time the secret's password is checked back in (i.e. every time a user disconnects or is disconnected from the account that the secret is connected to).
• Check in automatically after: Select this checkbox to specify a time period, after the expiry of which the secret's password will be automatically checked back in (i.e. after which the current user of the secret will be forcibly disconnected from the account that the secret is connected to).
• Force Check In (button): After adding the secret, while editing it later, this button can be clicked at any time to manually check the secret's password back in (i.e. to forcibly disconnect the current user of the secret from the account that the secret is connected to) at any time.
7. On the Permissions tab, add the required users who will be able to use the secret (by clicking the Add button and then selecting the required users / user groups), along with the permissions to be granted to each of them, as follows:
• Role Type permissions must be granted to the users / user groups added, by selecting either Owner, Editor or PAM User in the Role Type column.
• Advanced permissions can also be granted to any users / user groups added, by selecting the checkboxes (
- [For the Active Directory account,Windows account,Unix account (SSH)secret types only:] File Transfer (
- View Password (
- Copy Password (
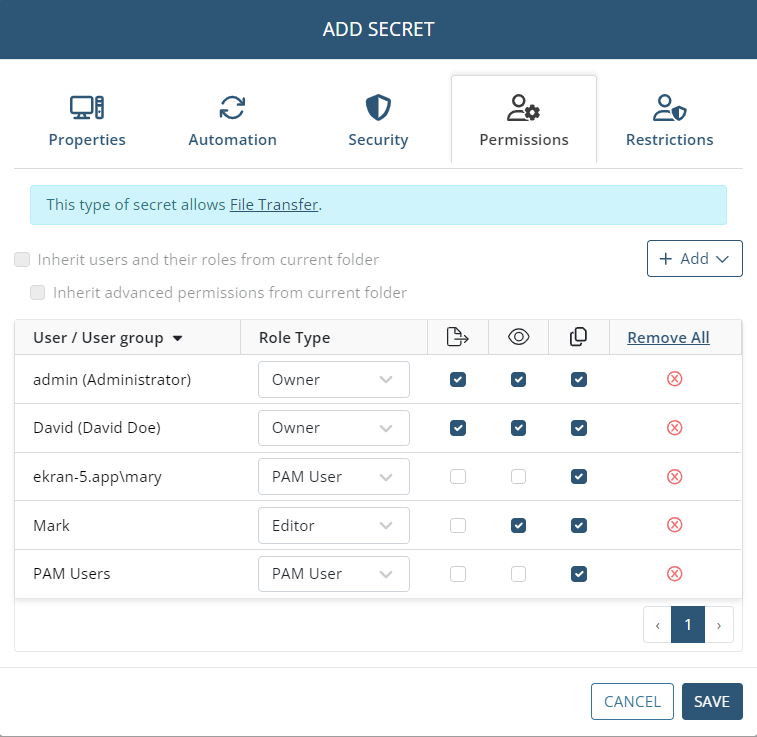
NOTE: Alternatively, the users / user groups who will be able to use the secret, along with their permissions, can be inherited from the parent folder if configured as required in this folder (except from the "All secrets" folder) by selecting the "Inherit users and their roles from current folder" checkbox (to inherit the users / user groups along with their Role Type permissions from the current folder) and the "Inherit advanced permissions from current folder" checkbox (to inherit the "View Password" and "File Transfer" advanced permissions for the users / user groups from the current folder).
NOTE: The default Syteca admin user as a root user will be able to access and modify all secrets created by other Syteca users.
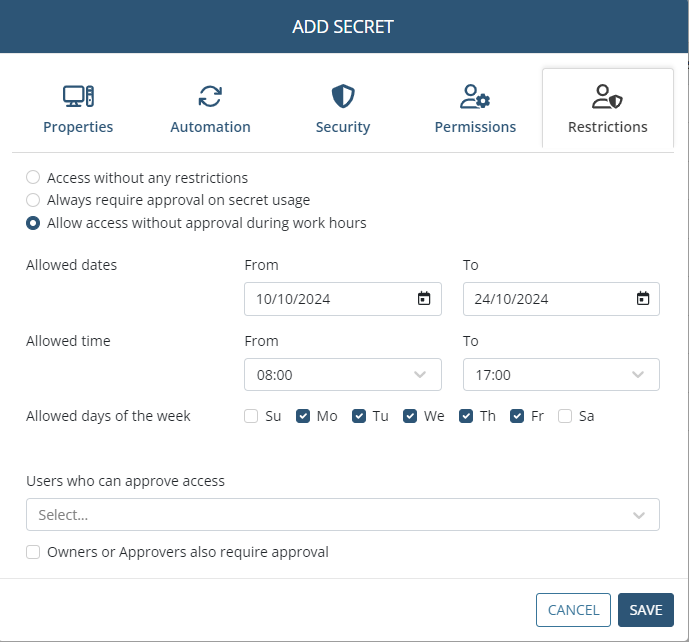
8. On the Restrictions tab, to configure any access restrictions required for the users of the secret, do the following:
• Select the required option:
- Access without any restrictions: If this option is selected, the secret's users will be able to use the secret without any restrictions.
- Always require approval on secret usage: If this option is selected, the secret's users will require approval when they attempt to use the secret.
- Allow access without approval during work hours: If this option is selected, specify the date range, work hours, and days of the week when the secret's users will be able to use the secret without approval.
• Users Who Can Approve Access: Select the Management Tool users (i.e. Approvers) who will be able to approve access requests to use the secret.
• Owners or Approvers also require approval: Select this checkbox to also require approval (e.g. by the default admin user) for Owners and Approvers to use the secret.
NOTE: Approvers receive notifications by email, and can approve access either by clicking the link in the email or by way of the Management Tool (see the Access Requests section).
9. Click the Save button (in the bottom right) to complete creating the secret.
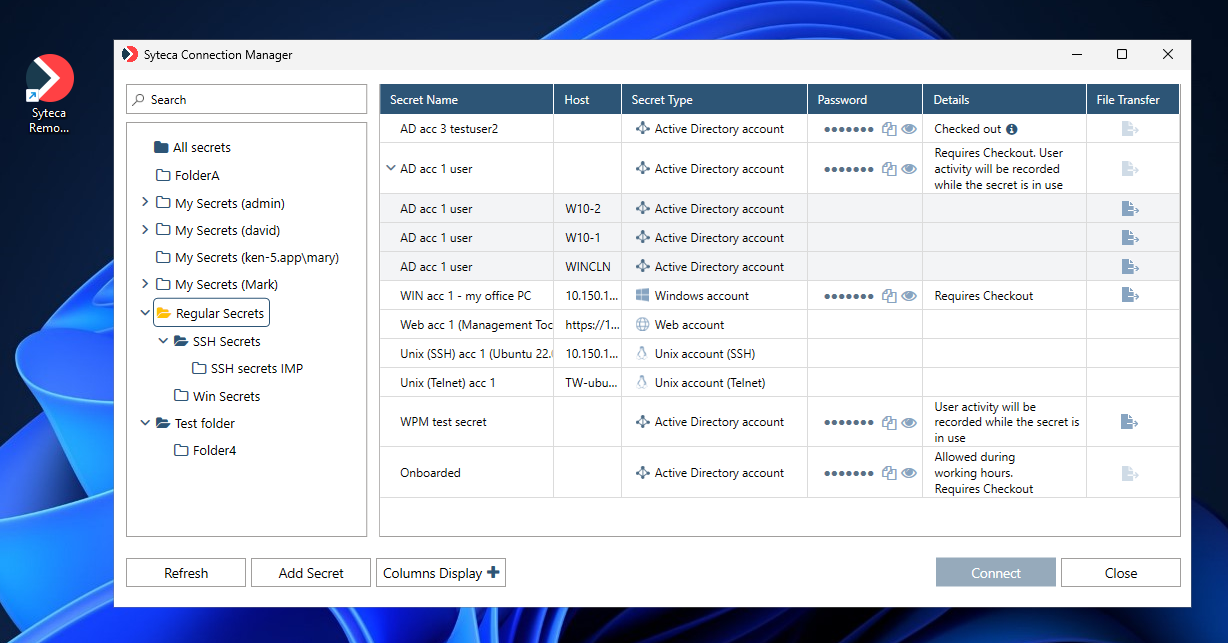
3. Using Secrets
The different types of secrets described below are used to access the corresponding different types of accounts.
3.1. Active Directory Accounts
The Active Directory account secret type allows you to select which computer you want to connect to in the Active Directory domain.
After selecting the required secret and clicking Connect, in the additional pop-up window that opens, enter the name of the Computer (or its IP address) that you want to access, and then click Connect.
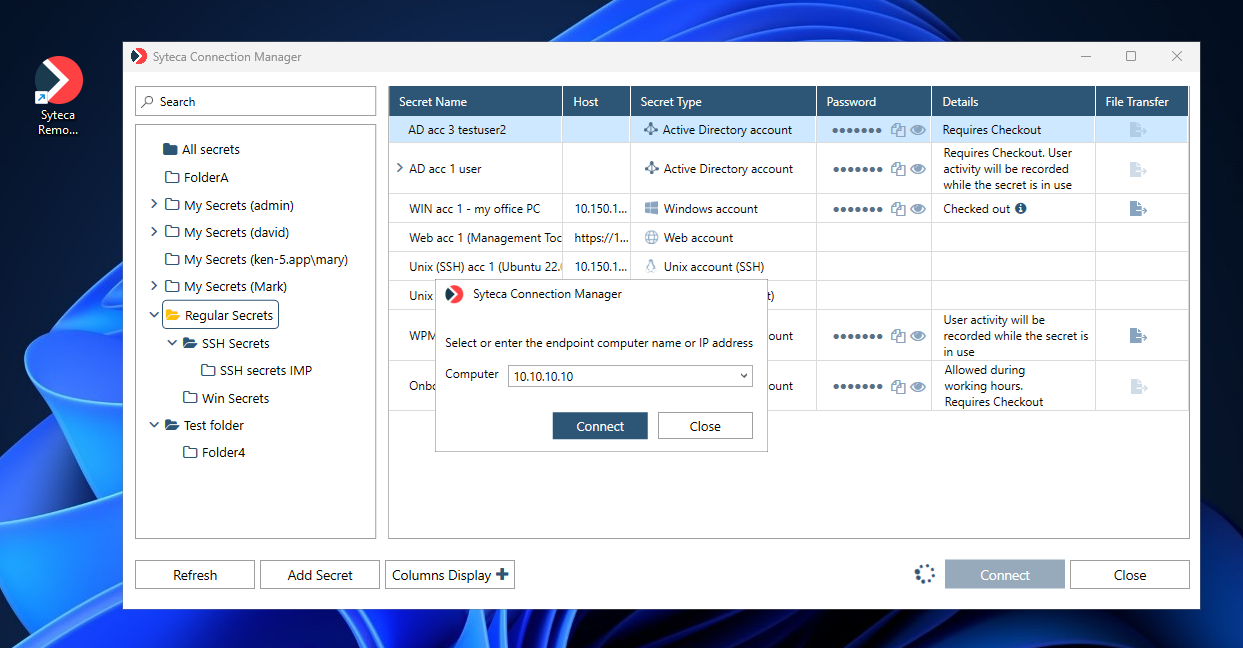
The system then automatically logs the user in to the Active Directory account, after clicking Connect to start using the secret.
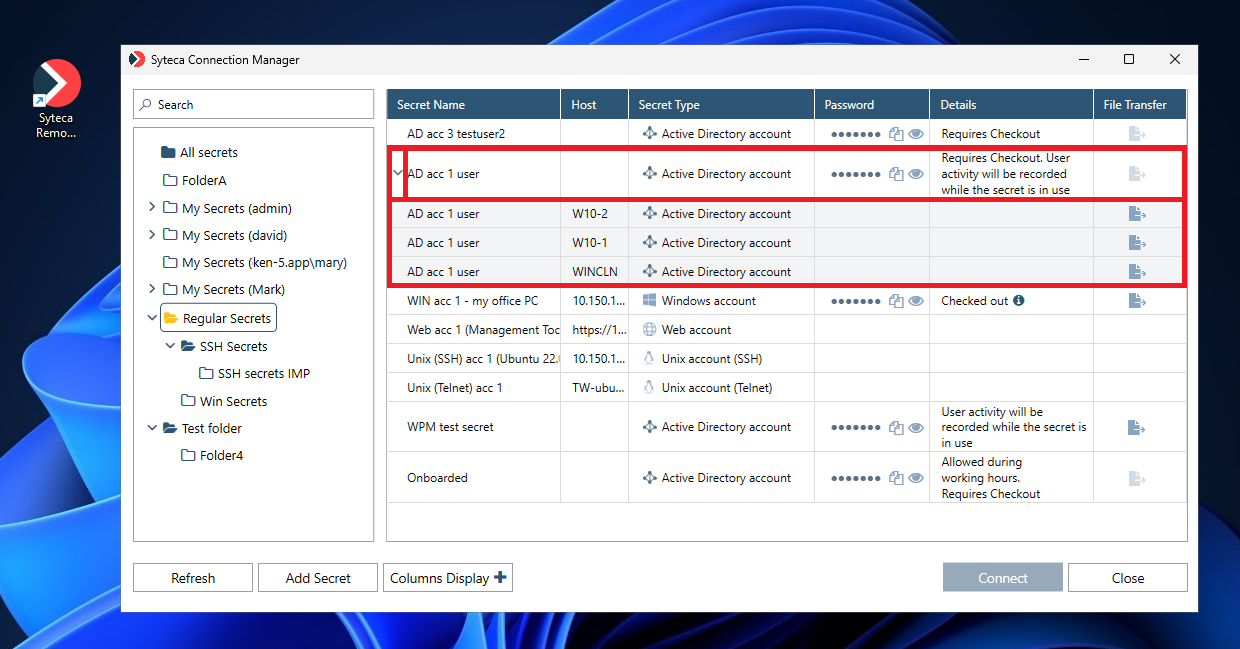
NOTE: If connections are only allowed to specific computers in the domain, the “parent” secret first needs to be expanded (by clicking the down-arrow (
3.2. Windows Accounts
The Windows account secret type allows you to work with local and domain user accounts on a specific computer.
The system automatically logs the user in to the selected Windows account (after clicking Connect in the Syteca Connection Manager) to start using the secret.

3.3. Unix Accounts (SSH)
The Unix account (SSH) secret type allows you to configure a secret user’s connection to a Unix account.
NOTE: [For the Unix (SSH) account secret type only:] PuTTY needs to be installed on the computer with the Syteca Connection Manager, and the "Use SSH key" option can also be selected instead of the "Use password" option when adding/editing the secret.
The system automatically logs the user in to the Unix account (SSH), after clicking Connect to start using the secret.

3.4. Unix Accounts (Telnet)
The Unix account (Telnet) secret type allows you to configure a secret user’s connection to a Unix account.
The system automatically logs the user in to the Unix account (Telnet), after clicking Connect to start using the secret.

3.5. Web Accounts
The Web account secret type allows you to configure a secret user’s connection to a Web account.
NOTE: The Web account secret type is only compatible with the Google Chrome browser (this type of secret will not work in other browsers). Also, Web account secrets always open in Incognito mode, which does not allow the browser to cache data.
The system automatically logs the user in to the Web account, after clicking Connect to start using the secret.
NOTE: If the system does not log you in automatically, an Syteca extension for the Google Chrome browser is available that allows you to insert the username and password for the Web account.

3.6. MS SQL Accounts
The MS SQL account secret type allows you to configure a secret user's connection to the database.
NOTE: Version 18.0 or higher of MS SQL Server Management Studio needs to be pre-installed for this type of secret to work.
The system automatically logs the user in to MS SQL Management Studio, after clicking Connect to start using the secret.
