
Opening the Management Tool
This page describes how to open and log in to the Management Tool for the first time.
Table of Contents
1. Opening and Logging in to the Management Tool
NOTE: For SaaS deployments, the process of opening and logging in to the Management Tool differs slightly from that for on-premises deployments described below. For more information, please refer to the Getting Started with a SaaS Deployment guide.
To open the Management Tool, do the following:
1. Open your browser and enter https://<Name_of_the_computer_or_IP_address_on_which_the_Management_Tool_is_installed>/<URL_that_was_specified_during_Management_Tool_installation> in the address bar, e.g. "https://john-pc/MyMonitoringSystem".
NOTE: If the self-signed certificate is not added to Trusted Root Certification Authorities, or the name of the computer entered in the browser address bar does not match the subject (in the Issued To field) of the certificate, your browser will display a certificate error when opening the Management Tool.
NOTE: When using recent versions of the Google Chrome browser (119.0.6045.160 and higher), a certificate error may be displayed when opening the Management Tool (to resolve this issue, please refer to the How Can I Fix the ERR_SSL_KEY_USAGE_INCOMPATIBLE Error in Recent Versions of Chrome Browser? page).
2. The Management Tool opens.
3. Enter the credentials of an existing user (i.e. of a user account that is displayed on the User Management page), and then click the Log In button.
• For an Internal user, enter the Login name and Password defined when the user was created in the Management Tool.
NOTE: When you open the Management Tool for the first time, enter the login ”admin” (or whatever it was changed to) and the password defined when the Application Server was installed.
• For a Windows Active Directory user, enter the Login name in the form <domain name>\<user name> and the AD authentication Password.
NOTE: If an AD user group has been added in the system, any users belonging to this group can log in using their Windows credentials.
4. If two-factor authentication (2FA) is enabled (i.e. if the Enable two-factor authentication on login checkbox is selected for your user on the User Management page), do the following:
• If you are logging in for the first time, scan the QR code displayed by using an authenticator app on a mobile device (e.g. Google Authenticator or Microsoft Authenticator) to set up 2FA, and make a note of the recovery code displayed, and then click the Confirm button.
NOTE: Make sure you save the recovery code displayed in case you lose access to your authenticator device.
NOTE: If 2FA is enabled, the user is forced to set up 2FA on their first login, and subsequently log in using 2FA; this feature can be disabled at any time on the User Management page.
.png?inst-v=362ca448-a20b-4783-93c2-f49186888f5c)
• Enter the authentication code generated by using your authenticator app, and click the Continue button.
).png?inst-v=362ca448-a20b-4783-93c2-f49186888f5c)
5. The Management Tool Home page opens.
By default, only one user can log in to the Management Tool at any one time using the same credentials. If another user logs in using the same credentials from a different IP address, the first user will be forcibly logged out. Concurrent session settings can be configured on the System Settings tab on the Configuration page.
Please note that the first time you open the Management Tool, it may take a while to launch, since IIS has not yet been used.
If you encounter any problems when opening the Management Tool, please refer to the Management Tool Issues section.
2. Locking Users on Multiple Failed Login Attempts
To improve security (e.g. by preventing brute-force attacks), this feature can be enabled to allow user accounts to be automatically locked (for a specified duration) after (a specified number of) multiple failed login attempts by any user.
.png?inst-v=362ca448-a20b-4783-93c2-f49186888f5c)
If a user enters an incorrect password multiple times, their user account is temporarily locked, meaning that they cannot log in (with their correct credentials) until either:
• A specified duration has passed since their last failed login attempt (after which their account will be unlocked automatically).
• An administrator (i.e. any user who has the administrative User Management permission) unlocks their account manually (see more information on the Locking and Unlocking Users page).
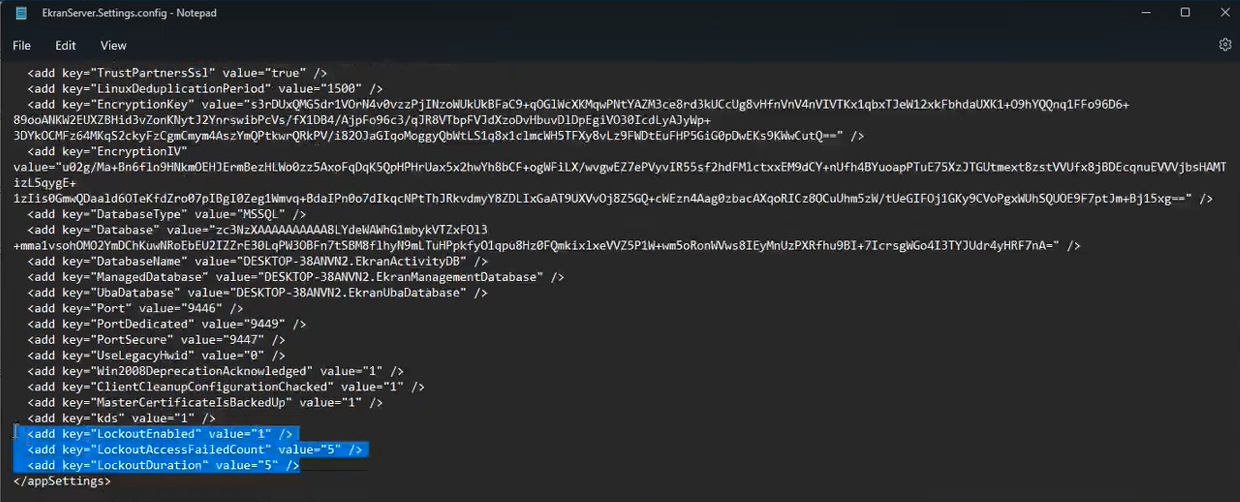
To enable this feature, and configure the parameters, open the EkranServer.Settings.config file (on the computer where Syteca Application Server is installed), and modify the values of the following keys:
• LockoutEnabled: Set the value to "1" to enable this feature (where the default value is "0"=disabled).
• LockoutAccessFailedCount: Set the number of consecutive failed login attempts after which any user account is locked, where the default value is "5" (and is in the range between min="3" and max="10").
• LockoutDuration: Set the duration that user accounts are locked for (in minutes), where the default value is "5" (and is in the range between min="5" and max="20" minutes).
NOTE: For SaaS deployments, since the EkranServer.Settings.config file is not available, please contact your Syteca vendor or the Syteca Support team to modify these keys in your environment.
NOTE: SSO (Single Sign-On) functionality is in no way affected by this functionality to lock user accounts on multiple failed login attempts, as these two features operate independently of one other.